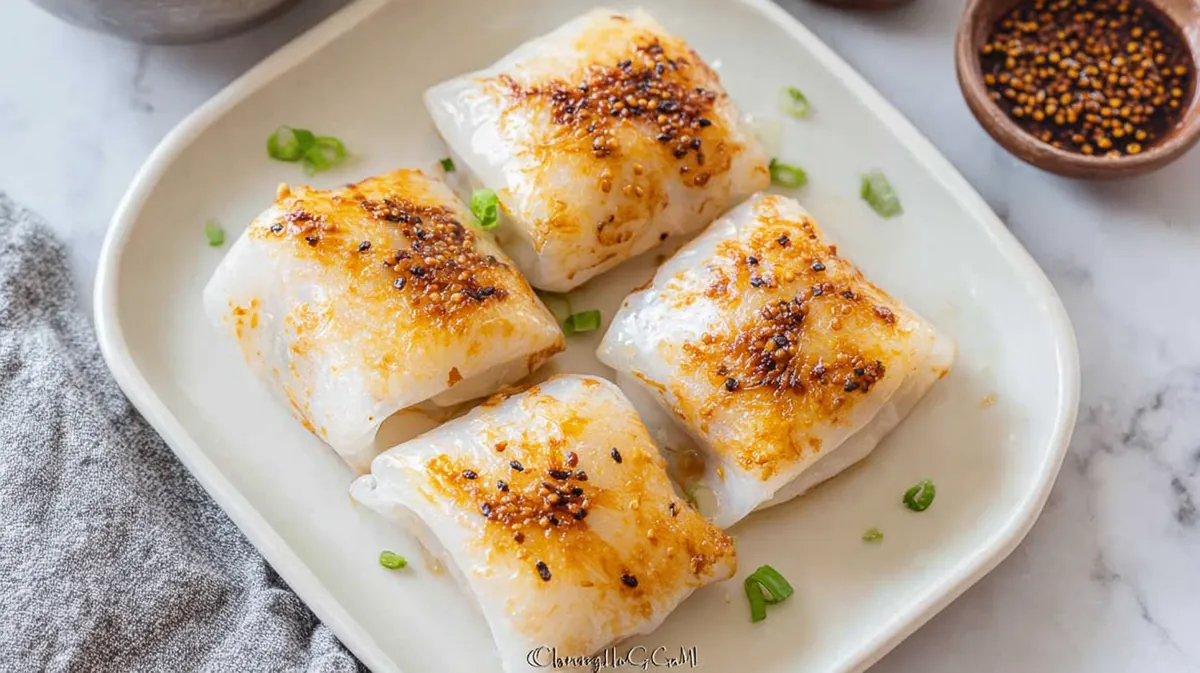
Melt-in-Your-Mouth Garlic Cheese Rice Paper Pockets
Have you ever bitten into a snack so delightful it felt like a warm hug? Get ready to discover the magic of Rice Paper Pockets with Garlic Cheese, a recipe that melts in your mouth and leaves you craving more! These little pockets are not just a treat; they’re an experience waiting to be had.
In this blog, I’m thrilled to share my go-to recipe for these irresistibly cheesy pockets. Whether you’re looking to impress your family or simply treat yourself, I’ll guide you through each step, sprinkle in helpful cooking tips, and inspire you to create not just a meal, but a moment of joy in your kitchen. Let’s dive into the delicious details that will make you a rice paper pocket pro!
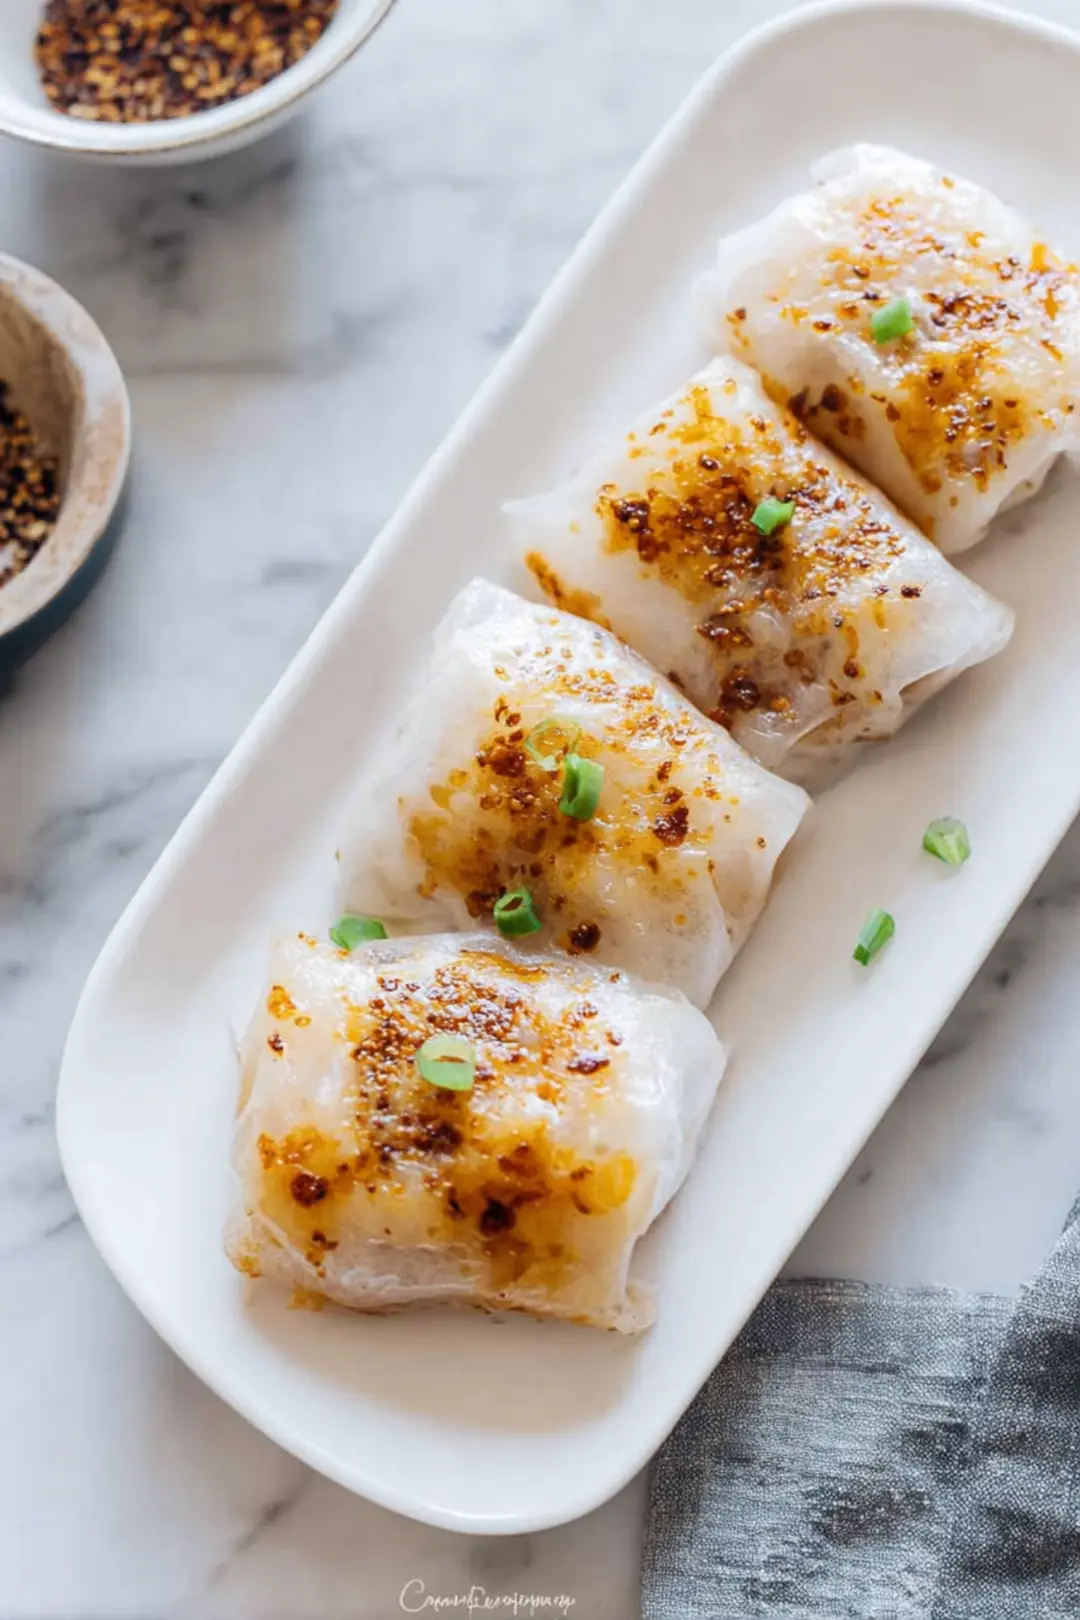
Table of Contents
Cooking Notes & Tips
Here are some key takeaways to help you master the art of making melt-in-your-mouth garlic cheese rice paper pockets. This easy recipe is set to become your new go-to for delightful meals and snacks!
-
Perfecting Your Wrap: When working with rice paper, remember to soak it just until it’s pliable. Too long in the water can lead to a gummy texture which some might find less than ideal for those crispy bites we all crave. In my kitchen, I find that a quick dip followed by a soft squeeze can bring them to the perfect state!
-
Cheese Choice: I recommend using a melty cheese like mozzarella or Monterey Jack for that gooey goodness. Mix it up with a spicy variant like pepper jack for a delightful twist! I keep a block of cheese on hand at all times; it’s a game-changer for those last-minute cravings that spark joy.
-
Add Some Greens: While this recipe shines with garlic cheese, don’t shy away from folding in chopped spinach or thinly sliced bell peppers for added color and nutrition. It’s a delicious way to sneak in veggies! In my experience, using colorful peppers not only enhances the look but also elevates the taste.
-
Avoid Overfilling: Keep your fillings modest. Too much stuffing can make it hard to roll and seal your pockets. Think “less is more” when it comes to achieving that perfect pocket shape — it’s all about balance!
-
Serving Suggestions: Pair these cheesy pockets with a homemade dipping sauce like sweet chili or a tangy soy-based dip for an extra flavor layer. An herby yogurt dip complements the richness beautifully!
-
Nutritional Balance: Feel free to swap in lower-fat cheese or even a dairy alternative for a lighter option. You’ll be amazed at how well these pockets maintain their flavor while being kinder to your waistline.
-
Crisp It Up: To keep your rice paper pockets crispy, consider air frying them for that golden finish. A light brush of oil works wonders! I always keep a spray bottle of olive oil nearby for quick jobs; it allows for an even crisp without the fuss.
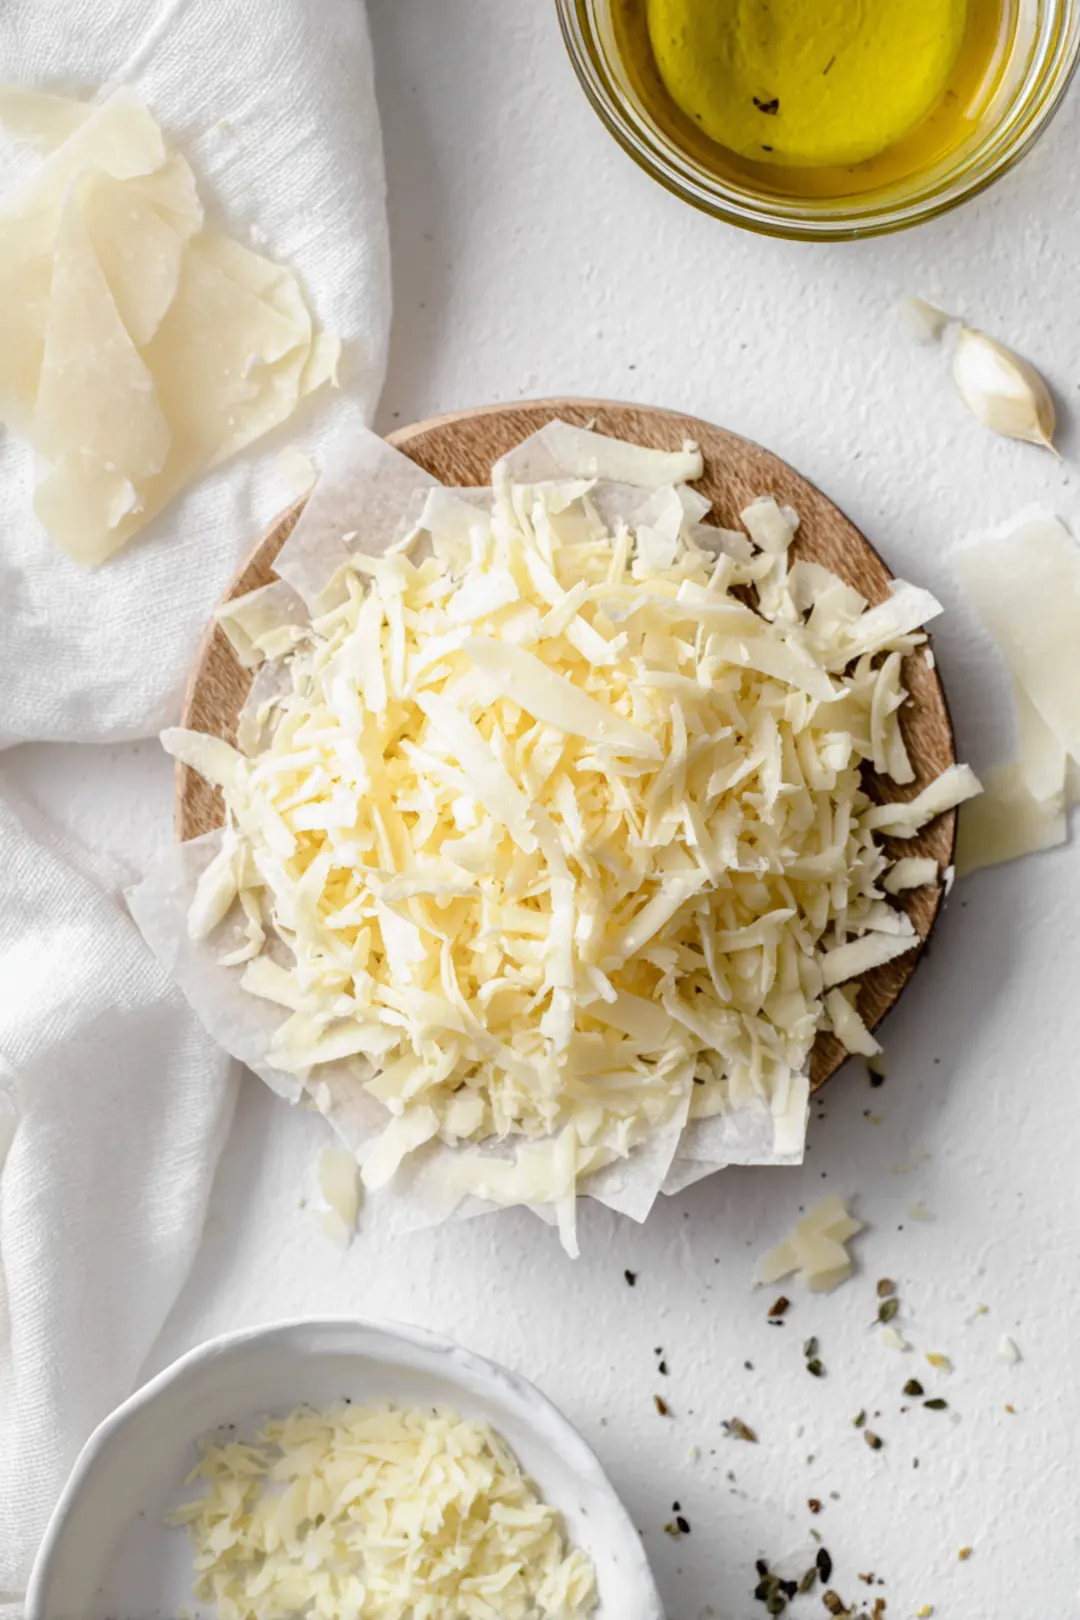
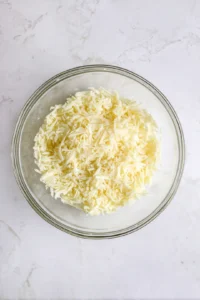
Ingredients for Garlic Cheese Rice Paper Pockets
Essential Components
-
Rice Paper Sheets: When shopping for rice paper, quality is key! I always recommend brands like Three Ladies or Banh Trang Rice Papers. They’re durable and won’t tear easily during frying or baking, giving you confidence as you assemble your pockets.
-
Cheese Options: Mozzarella is a classic choice for its meltiness, but don’t hesitate to explore other varieties! Consider Monterey Jack, with its creamy texture, or spicy pepper jack to add exciting flavors. The melting properties of these cheeses are essential for achieving that indulgently cheesy bite.
-
Garlic: There’s no substitute for freshly minced garlic to elevate flavor! If you’re in a hurry, a dash of garlic powder will do the trick—just remember to adjust the amount since it’s more concentrated: about 1/4 teaspoon covers one clove of fresh garlic.
Optional Add-Ins
-
Greens: Think about adding fresh spinach, bell peppers, or even kale. They enhance not just nutrition but also add delightful crunch and vibrancy to your filling. Make sure to chop them finely for easy stuffing!
-
Flavor Enhancers: Fresh herbs like basil or cilantro lend brightness, while sliced jalapeños add a fun kick against the cheese’s richness. Let your creativity flow here; complementing flavors can elevate every bite to a new level.
-
Sweet or Savory Sauces for Dipping: Let’s not overlook sauces! A homemade sweet chili sauce or a refreshing herbed yogurt dip can truly elevate these pockets. They’re perfect for dipping and create a beautiful balance of flavors.
Step-by-Step Preparation
Preparing the Filling
-
How to Properly Shred Cheese: Grate your cheese using a box grater or a food processor. This helps achieve the perfect shreddiness for meltiness. Who doesn’t love a pocket bursting with gooey cheese?
-
Sautéing Garlic: To infuse your filling with rich flavor, sauté minced garlic in olive oil just until fragrant—about 30 seconds should suffice. Be attentive here; you want to avoid browning the garlic for that mellow taste. A pinch of salt while sautéing enhances its sweetness beautifully!
-
Adding Veggies: Chop your chosen greens finely before mixing them with the garlic and cheese. This blend allows the flavors to meld together, ensuring every bite enjoys a delightful balance.
Mastering the Rice Paper
-
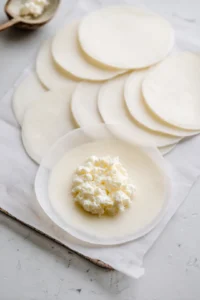
Soaking Process Tips: For the perfect texture, soak your rice paper sheets in lukewarm water for around 10 seconds. This temperature helps prevent over-softening — you want them pliable but not too floppy!
-
How to Handle the Rice Paper: After soaking, lay each sheet on a damp cloth to keep it flexible for wrapping.
-
Wrapping Techniques: When it’s time to wrap, place a spoonful of filling just below the center of the sheet. Fold the bottom up, tuck in the sides, and roll tightly from the bottom to the top. With a bit of practice, you’ll be wrapping like a pro in no time!
Cooking Methods
Air Fryer Method
-
Best Practices for Air Frying: Start by preheating your air fryer to 375°F (190°C). Lay your rice paper pockets in a single layer for even cooking — no one enjoys soggy pockets!
-
Achieving the Perfect Golden-Brown Crisp: Cook for 12-15 minutes, flipping halfway through for an evenly golden-brown finish. A light spray of cooking oil on the outside helps create an irresistible crunch. For more air fryer inspiration, check out these Air fryer crispy sage leaves that also make a delightful snack!
Oven Baking Method
-
Optimal Temperature Settings: For baking, preheat your oven to 375°F (190°C) and allow about 20 minutes. Keep a close eye on them to ensure they stay crispy but don’t become dry.
-
Keeping the Rice Paper Moist but Crispy: Position the baking sheet on the middle rack for uniform heat distribution. Avoid stacking your pockets, as that can lead to sogginess.
Serving Suggestions
Dipping Sauce Ideas
-
Quick Recipes for Homemade Sweet Chili Sauce: Combine 1/4 cup sugar, 1/4 cup vinegar, and 1/2 cup water in a saucepan. Add 2 tablespoons of chili flakes and simmer until slightly thickened. It’s sweet with the right zing!
-
Herbed Yogurt Dip: Mix plain yogurt with fresh herbs like dill or parsley, a squeeze of lemon, and a pinch of salt. This dip is incredibly refreshing and complements the richness of the rice paper pockets perfectly.
Plating Tips
-
Garnishing Ideas: Fresh herbs or a sprinkle of sesame seeds can make your pockets pop! They add lovely visual touches while providing depth of flavor.
-
Serving Flavors: Consider serving your pockets with a light seasonal salad for contrast with the warm, cheesy filling—perfect for impressing guests during gatherings!
Tips for Success and Customization
Perfecting the Wrap
-
Avoiding Common Pitfalls: Keep in mind that less is often more! When filling your pockets, a tablespoon of filling usually suffices. And if your rice paper tears, don’t worry—patch it up with a small piece from another sheet. It’s part of the creative cooking process!
-
Utilizing Different Rolling Methods: There’s no one way to do this! Experiment with rolling styles to find your favorite, whether it’s a burrito-style wrap or the classic method. Make it your own!
Dietary Adjustments
-
Making It Vegan: For the plant-based crowd, consider swapping regular cheese for a vegan counterpart. Nutritional yeast brings that cheesy essence without any dairy!
-
Gluten-Free Considerations: One of the beauties of rice paper is its natural gluten-free quality! Pair your rice paper pockets with gluten-free dips or sides for a wholesome meal.
Nutrition and Health Considerations
Nutritional Insights
While I won’t dive deep into specific numbers, I can assure you these pockets are packed with goodness. Garlic, in particular, is noted for its health benefits. As stated by the Mayo Clinic, “Garlic has long been known for its powerful health benefits, including anti-inflammatory properties.” This makes our delicious filling not just tasty but nourishing as well!
Recommended Serving Sizes
These delightful rice paper pockets can serve as generous snacks or light meals. Aim for two pockets for a snack and four as a light meal, especially if paired with your favorite sides. Balancing them with grilled veggies or a fresh salad enhances your meal’s overall nutrition—mix and match to enjoy!
FAQs
What are rice paper pockets?
Rice paper pockets are culinary creations made from rice paper wrappers, typically filled with a variety of ingredients like vegetables, cheese, or proteins. These versatile delights can serve as appetizers or snacks, providing a unique texture and flavor experience.
How do I keep rice paper pockets crispy?
To keep rice paper pockets crispy, avoid overfilling them and ensure they are sealed tightly. Cooking them at a higher temperature in an air fryer or oven can help maintain their crispness. Serve immediately for the best texture!
What can I fill rice paper pockets with?
These pockets can be filled with a range of ingredients, including fresh vegetables, cheeses, herbs, and proteins. For a delicious vegetarian option, mix garlic cheese with fresh spinach or other colorful veggies.
Can I use cheese in rice paper rolls?
Yes, you can absolutely use cheese in rice paper rolls! Creamy cheeses like ricotta or mozzarella add richness and flavor. Just be careful not to use too much to maintain the structure of the roll.
How to make rice paper pockets?
To make rice paper pockets, soften the rice paper in warm water, fill with your desired ingredients, and fold tightly to seal. Cooking in an air fryer will add a crispy finish, making them a delightful snack or appetizer.
Conclusion
Creating Melt-in-Your-Mouth Garlic Cheese Rice Paper Pockets is not just about following a recipe; it’s about embracing your creativity and flavor preferences. By selecting quality rice paper and the right cheese, along with fresh veggies, you can craft pockets that are as nutritious as they are delicious. Whether you opt for air frying or oven baking, remember to keep things simple and fun.
These pockets are perfect for customization, so don’t hesitate to experiment with your favorite herbs and dips to make them uniquely yours. They’re sure to become your go-to option for a cozy family meal or an impressive gathering dish. So, roll up your sleeves, gather your ingredients, and let the joy of cooking fill your kitchen! Happy cooking, my friends! Let’s make some magic happen!
Melt-in-Your-Mouth Garlic Cheese Rice Paper Pockets
Ingredients
Method
- Preheat your oven to 375°F (190°C).
- In a bowl, mix together the shredded cheese, minced garlic, and olive oil until well combined.
- Soak each rice paper sheet in lukewarm water for about 10 seconds until soft. Place a spoonful of the cheese filling in the center, fold over the sides, and roll tightly.