Crispy Air Fryer Loaded Potato Skins: Easy Recipe!
Have you ever craved that perfect crunch of a loaded potato skin and found yourself stuck in the kitchen trying to make it happen? Well, let me tell you — with this easy air fryer loaded potato skins recipe, you’ll bring that bar-like goodness right to your table in no time!
Whether you’re gearing up for a spontaneous gathering or just need a quick family dinner idea, this guide will take you step-by-step through the process of achieving crispy, flavorful perfection. Get ready to delight your taste buds and impress your guests with toppings galore! Let’s roll up our sleeves and dive into this delicious adventure!

Table of Contents
Why You’ll Love This Recipe
Making crispy air fryer loaded potato skins is not only a breeze but also a fun way to bring everyone together around the table. These handy tips will ensure your potato skins turn out perfectly every time, making them a go-to for those hurried Tuesday nights or casual get-togethers.
-
Choose the Right Potatoes: For the crispiest skins, go for russet potatoes. Their starchy content creates that perfect crunch and a fluffy center that’s simply irresistible. I always keep a bag of russets on hand; they are my secret weapon for satisfying cravings!
-
Don’t Overcrowd the Basket: Give your potato skins room to breathe! Overcrowding can lead to uneven cooking and chewy skins. Think of it as giving each skin its own cozy little space to achieve optimal crispiness.
-
Prep Ahead for Quick Dinners: Make the potato skins in advance and store them in the fridge. When you’re ready to eat, just pop them in the air fryer for a quick reheat. It’s a great time-saver when you’re juggling life’s chaos! In my kitchen, having prepped ingredients ready to go saves my sanity on busy nights!
-
Top It Your Way: Explore various toppings to please all palates. If you’ve got vegan friends, try avocado and pico de gallo. For something indulgent, don’t skip the sour cream and crispy bacon – it’s heaven on a plate.
-
Watch Your Cooking Time: Depending on the thickness of your skins, you might need to adjust your air frying time. Keep an eye on them the first time you make them; golden brown is your sweet spot!
-
Serve with Dips: Elevate your potato skins by pairing them with homemade ranch or a zesty salsa. It’s all about that extra layer of flavor that keeps everyone coming back for more! A great dip can really take your dish over the top; don’t underestimate it!
-
Embrace Imperfection: If a few skins end up a bit wonky, don’t stress! Sometimes the best bites come from those imperfect little gems that are stuffed to the brim with toppings.
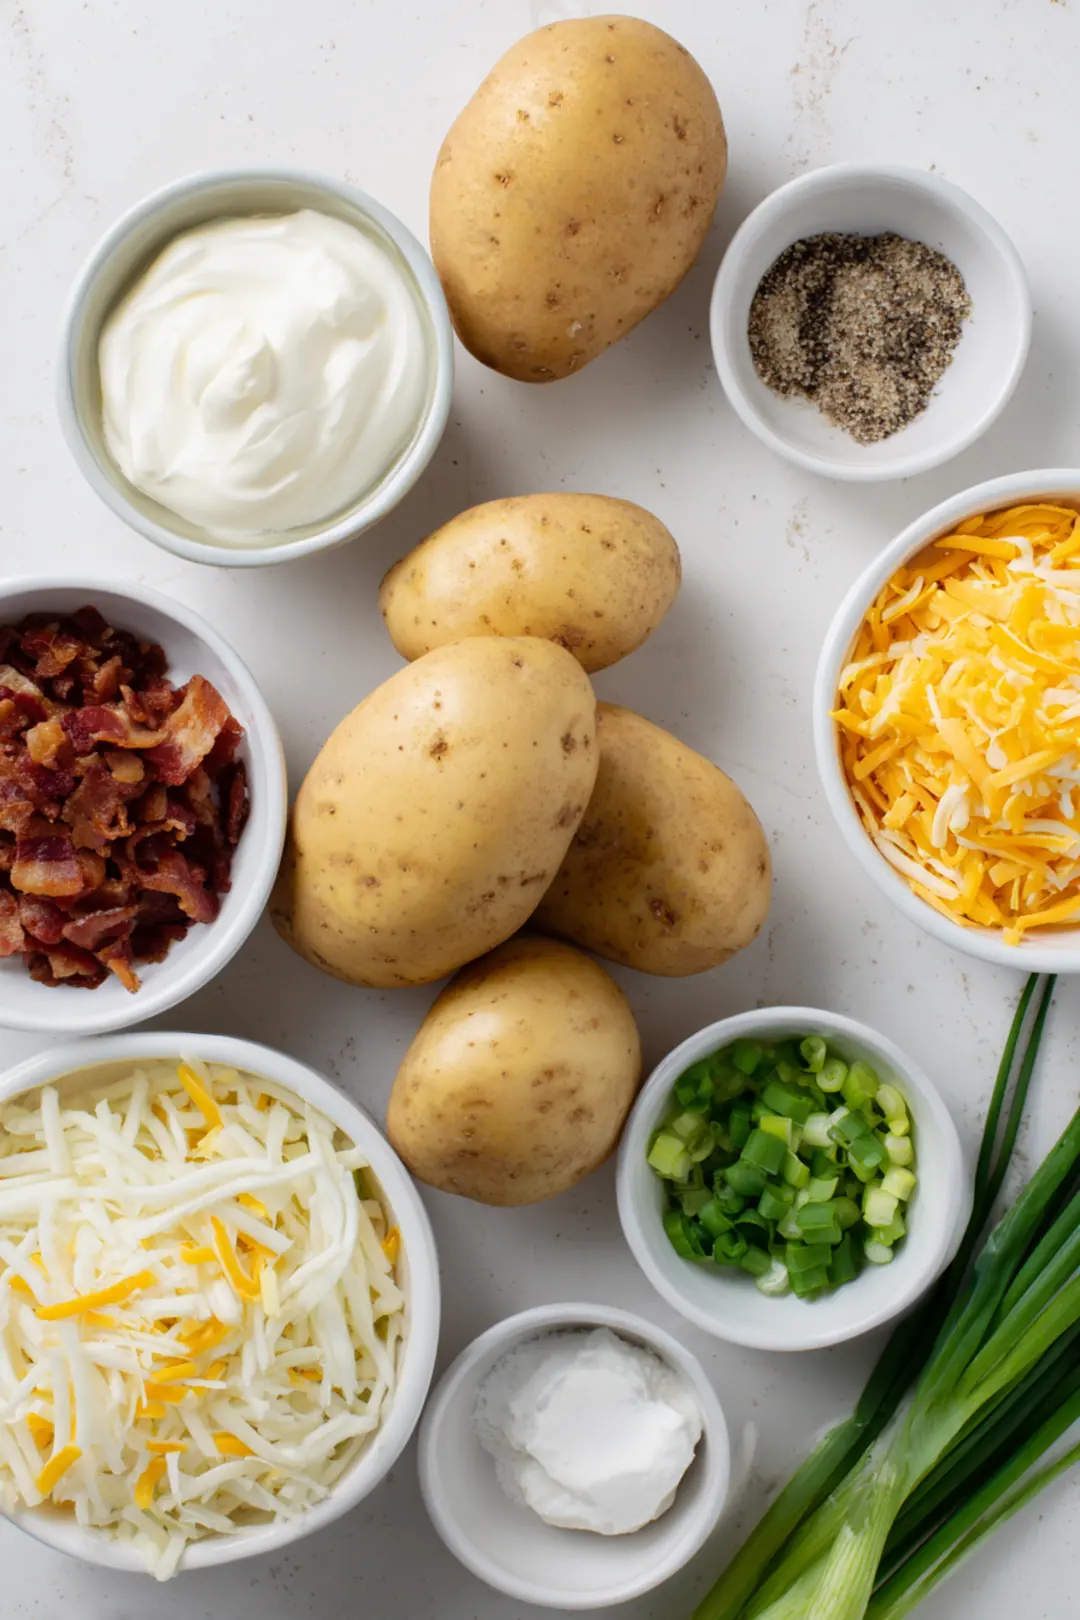
Ingredient Benefits
When crafting these air fryer loaded potato skins, be mindful of the ingredients you choose. Here’s a bit about the nutritional powerhouses you’re working with:
-
Russet Potatoes: Besides being delightfully fluffy on the inside, russet potatoes are a good source of potassium and vitamin C, both of which contribute to overall health. Salt and pepper may be simple, but they play a significant role in elevating the dish’s flavor.
-
Olive Oil: This isn’t just a cooking oil — it’s a heart-healthy fat! “The monounsaturated fats in olive oil may help reduce inflammation and have beneficial effects on genes linked to cancer.” – Healthline. This aromatic oil brings out that golden crispiness in the skins while offering extra flavor.
Step-by-Step Preparation
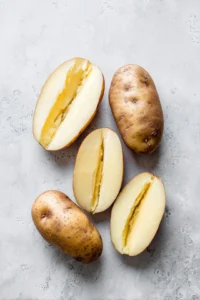
1. Prepping the Potatoes
The key to great potato skins starts with some tender loving care for your potatoes:
-
Washing and Scrubbing: Give your russet potatoes a thorough scrub under cool running water. It’s like giving them a spa day! Removing any dirt ensures that you’re left only with wholesome goodness.
-
Baking or Boiling: You can choose either method here. If you bake them for 45 to 60 minutes at 400°F (200°C), you’ll unlock a buttery flavor. But if you’re in a hurry, the air fryer can step in and speed up the process significantly! Try making some air fryer buffalo chicken dip (hot) as a great side while you wait.
-
Scooping Out the Flesh: Take your time with this part. Leave about a quarter-inch wall of potato; this thickness will give you a sturdy base. It’s all about that balance between crispy skin and tender potato goodness.
2. Seasoning the Skins
Let’s turn up the flavor:
-
Adding Oil and Spices: Brush the insides of your potato skins with olive oil and sprinkle with salt and pepper. This is crucial—don’t skimp here. Olive oil not only helps with crispiness but also elevates the taste by providing depth. If you want to add an extra kick, consider using some air fryer jalapeno poppers with bacon on the side!
-
Tips for Even Distribution: Feel free to use your hands! It’s the best way to ensure the oil and seasonings get into every nook and cranny, unlocking layers of flavor.
3. Air Frying Process
Now for the action-packed part—the air frying!
-
Air Fryer Settings: Preheat your air fryer to 400°F (200°C). This is a non-negotiable moment; the right temperature is pivotal for achieving that delightful crispiness!
-
Flipping Halfway: Set a timer! Flip those skins halfway through the cooking process (around 8 minutes in). This isn’t just a casual suggestion; it’s essential for even cooking. You want that crisp on every side!
Flavor Customization
1. Explore Alternative Toppings
One of the joys of loaded potato skins is experimenting with toppings:
-
Swapping Cheeses: Why stick with plain cheddar? Go bold with pepper jack for a spicy kick, or a sharp blue cheese for a tangy twist! This creativity can turn a simple snack into a gourmet experience.
-
Full Vegetarian Options: Sautéed mushrooms, colorful bell peppers, or a good handful of spinach can add depth and color to not only the flavor profile but also the presentation.
-
Bold Flavors: Change gears by adding BBQ sauce, buffalo chicken, or pulled pork for those who crave something spicier, like air fryer buffalo chicken dip (hot). It’s a guaranteed hit for gatherings!
2. Adjusting for Dietary Needs
It’s wonderful to create a dish that everyone can enjoy. Here’s how:
-
Vegan Variations: Just swap out the dairy! Dairy-free cheese and sour cream ensure that every person at your table gets to dig in, no matter their dietary preferences.
-
Gluten-Free Options: Always double-check if your toppings are gluten-free. Great choices include fresh herbs or gluten-free sauces to keep it delicious for every dietary need!
Tips for Perfect Results
1. Timing and Temperature
Perfection comes with practice:
-
How to Know When They’re Done: You’re looking for that perfect golden-brown color and a light crunch! If you’re unsure, don’t hesitate to taste one. A quick sample will confirm if they’re just right.
-
Adjusting for Skin Thickness: If some skins happen to be thicker, take note—they may need a little extra time in the fryer. A minute or two can make all the difference for that ultimate crunch.
2. Avoiding Common Mistakes
Let’s steer clear of mishaps:
-
Preventing Sogginess: Air circulation is vital! Overcrowding the basket is a big no-no! Ensure each skin has space to crisp up beautifully.
-
Overcooking Danger: Stay vigilant! If you see them darkening too much, peek in and assess. A little adjustment can save you from losing that coveted crunch, which we all desire!
3. Serving Suggestions
Make your dish shine even more:
-
Pairing Ideas: Think of sides like homemade ranch or zesty guacamole; they add so much flavor and richness. A great dip can elevate your dish to new heights!
-
Creative Plating: Don’t just throw them on a plate; layer with colorful toppings and arrange thoughtfully. A well-presented dish enhances the experience before the first bite!
Nutritional Information
1. Understanding Caloric Content
Remember, the caloric content can fluctuate based on toppings. It’s a good idea to keep portion sizes in mind—truly, a little goes a long way!
2. Healthy Substitutions
Swapping sour cream for Greek yogurt can create an incredibly creamy texture while packing a protein punch without a hint of guilt.
3. Citing Reliable Sources
Nutritional awareness is crucial; utilize guidelines from reputable sources like the USDA. This knowledge not only enriches your meals but empowers your choices, making dining a mindful experience.
Now, roll up your sleeves, unleash your creativity, and enjoy whipping up a batch of scrumptious air fryer loaded potato skins!
FAQs
How long do loaded potato skins take in an air fryer?
Loaded potato skins typically take about 10-15 minutes in an air fryer at 400°F (200°C). Flip them halfway through for optimal crispiness. You’ll be enjoying this satisfying snack in no time!
What toppings can I put on air fryer loaded potato skins?
You can customize your loaded potato skins with various toppings such as shredded cheese, crispy bacon bits, sour cream, chives, or even jalapeños for a spicy kick. Get creative with your favorites, and don’t be afraid to mix it up!
What 5 foods should you not put in an air fryer?
Avoid putting foods that are high in moisture like wet batters, leafy greens, or cheese that can melt and drip. Additionally, avoid delicate items like certain fish and foods with breading that may not hold up well.
How to make loaded potatoes in an air fryer?
To make loaded potatoes in an air fryer, start by slicing cooked potatoes in half. Scoop out some flesh and fill with cheese, bacon, and other toppings. Air fry for 10-15 minutes until hot and crispy.
Can I use other types of potatoes for loaded potato skins?
Absolutely! While russet potatoes are most popular for their sturdy skin, feel free to use Yukon gold or sweet potatoes for a unique twist. Just adjust the cooking times based on the type of potatoes you use.
Conclusion
Creating crispy air fryer loaded potato skins is not just a treat; it’s a testament to how simple ingredients can elevate a dish from ordinary to extraordinary. By focusing on quality potatoes and heart-healthy olive oil, you’re already on the path to success. Remember to savor each moment as you prep, scoop, and season — it’s all part of the joy of cooking!
Explore different toppings and accommodate dietary needs to ensure everyone can join in on the fun. And don’t forget: practice makes perfect, so embrace the art of adjusting cooking times to achieve that lovely golden-brown crunch.
Now, grab your air fryer and let your culinary creativity run wild, bringing a little magic to your dinner table. Happy cooking, my friends! 🍽️

Crispy Air Fryer Loaded Potato Skins: Easy Recipe!
Ingredients
Method
- Preheat your air fryer to 400°F (200°C).
- Cut the russet potatoes in half lengthwise and scoop out some of the insides to create a cavity.
- Brush the potato skins with olive oil and season with salt and pepper. Place in the air fryer basket and cook for 15 minutes, flipping halfway through. After cooking, fill with your favorite toppings and serve warm!