Decadent Air Fryer Chocolate Lava Cake Recipe
Craving a dessert that oozes decadence with each bite? Get ready to experience pure bliss with this air fryer chocolate lava cake!
In this delightful recipe, I’ll guide you through the process of crafting that perfect molten center, ensuring that you and your loved ones are left begging for seconds. With just a few simple tips and techniques in your arsenal, you’ll unlock the secrets to making a rich and gooey lava cake that’s as easy as it is indulgent. Let’s heat things up and dive right into the delightful world of air-fried desserts!
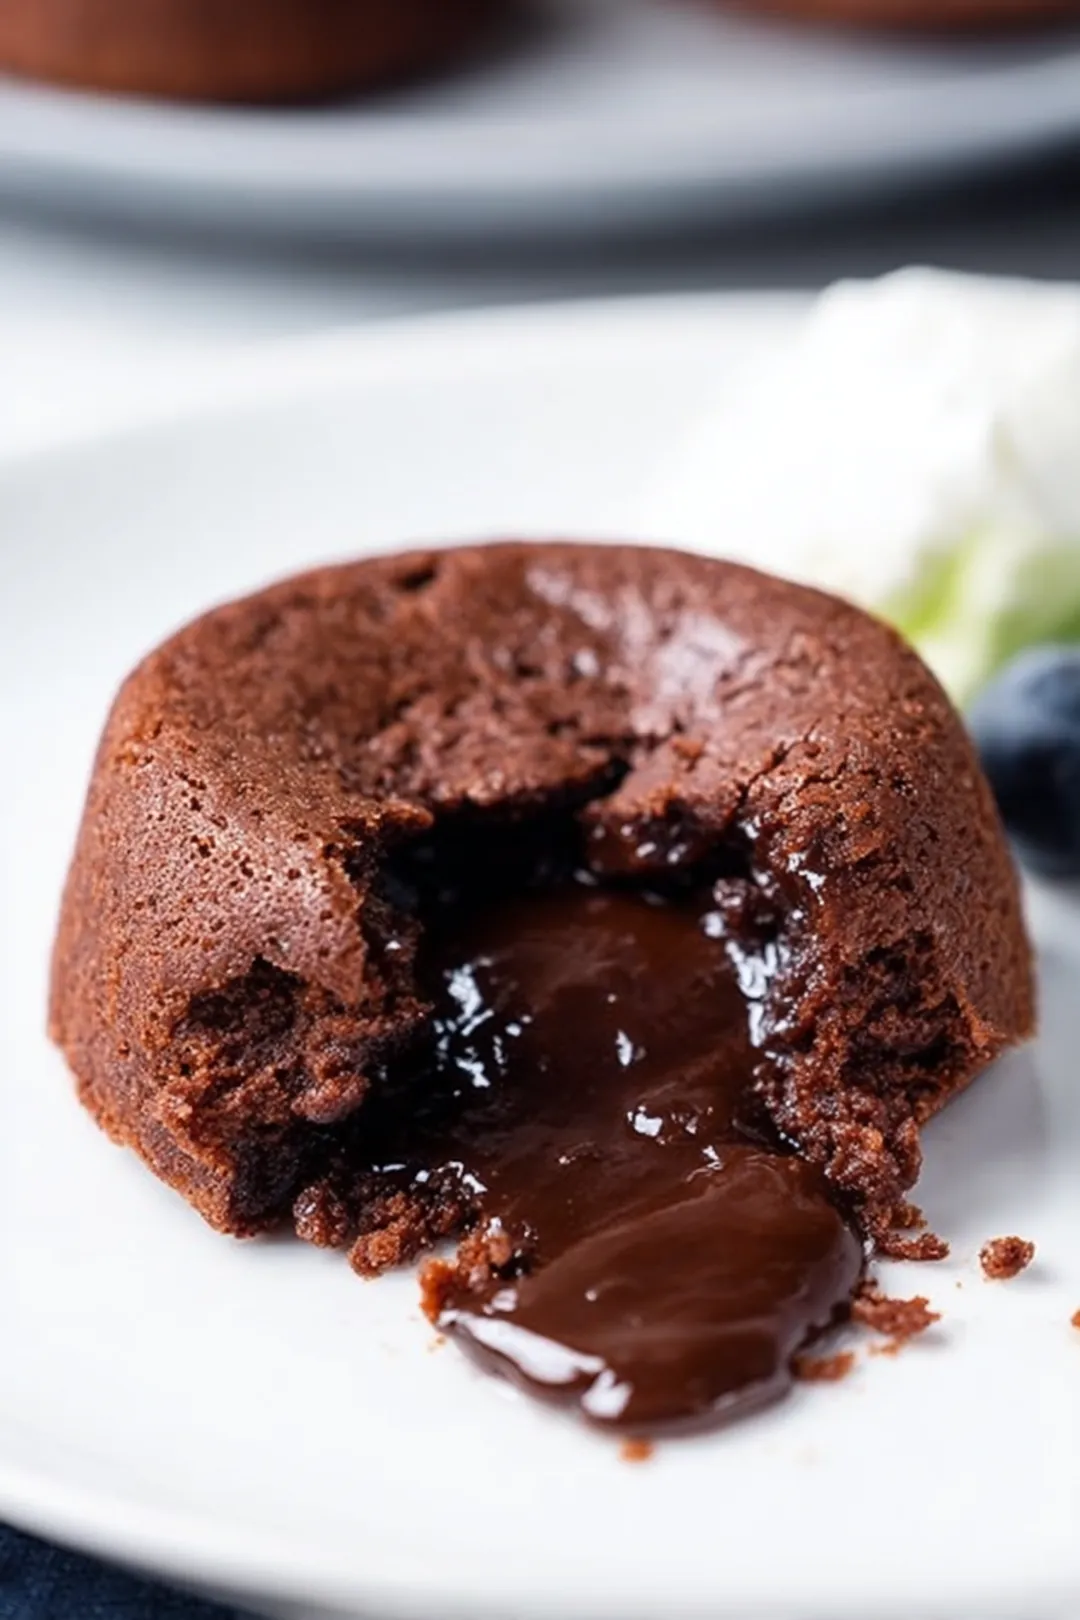
Table of Contents
Quick Tips
When you’re stepping into the world of decadent air fryer desserts, keep these essential tips in mind to guarantee that your chocolate lava cake emerges perfectly gooey and utterly delightful. So grab your apron and let’s explore the must-know insights that will elevate your baking game!
-
Check Your Chocolate Quality: Always opt for high-quality chocolate to enhance the flavor of your cake significantly. A rich chocolate, ideally around 72% cocoa, imparts deep flavors that will leave a lasting impression with each bite.
-
Perfect the Timing: Overcooking is the arch-nemesis of a luscious lava cake! Start with 10 minutes in the air fryer and be vigilant during those last couple of minutes for that ideal lava-like center. In my kitchen, I frequently check a minute or two early—every air fryer has its quirks!
-
Substitution Savvy: Don’t have all-purpose flour on hand? Swap in almond flour for a gluten-free twist. Just keep in mind that it may alter the texture slightly, but I promise it will still be delicious!
-
Crispy Edges, Soft Center: Lightly spray your ramekins with oil to create those lovely crispy edges while keeping the center delectably gooey. A well-coated ramekin is essential; a touch of oil goes a long way in achieving that perfect release!
-
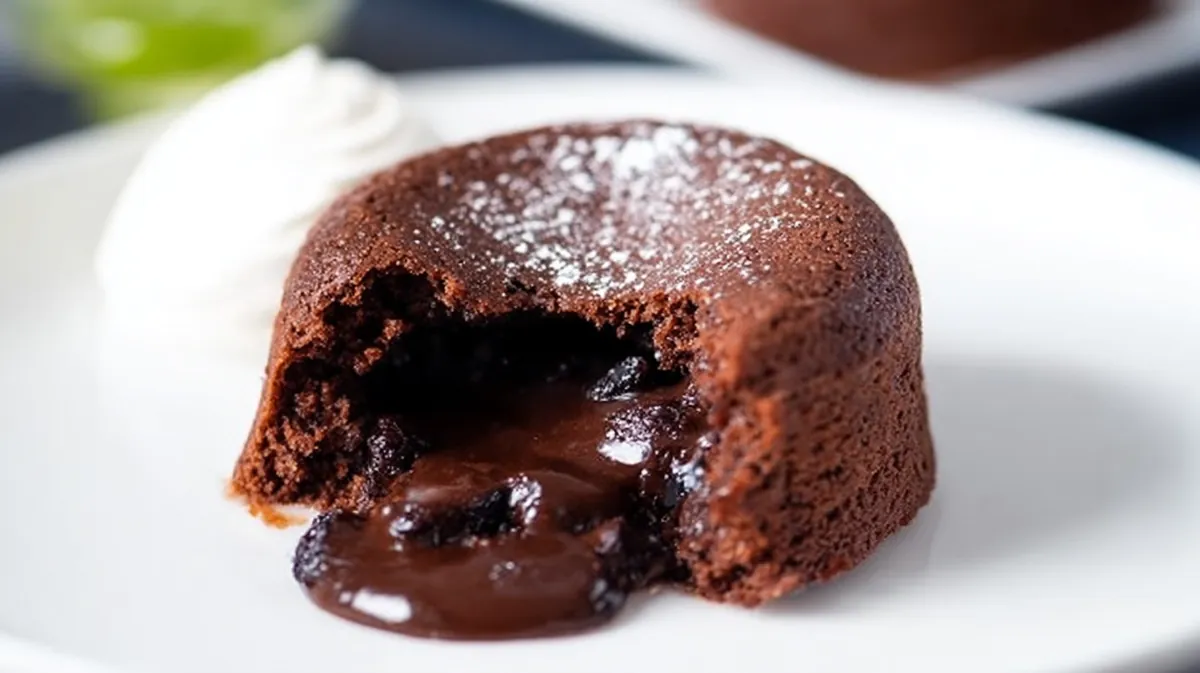
Serve Hot: For the ultimate experience, serve your lava cake immediately—with a scoop of vanilla ice cream or a dollop of whipped cream. The contrast of hot and cold takes this dessert to an elevated flavor experience.
-
Healthier Indulgence: Want to make this a guilt-free treat? Use coconut sugar instead of regular sugar, and consider substituting Greek yogurt for some of the butter. This creates a lighter version that still packs plenty of flavor.
-
Avoiding Common Pitfalls: Remember not to overfill your ramekins! Lava cakes need space to poof up — aim for about three-quarters full for the best rise and a luscious core.
With these tips in hand, you’re now ready to embark on the rich and satisfying journey of creating your own air fryer chocolate lava cake masterpiece!
Ingredient Overview
Essential Ingredients for Chocolate Lava Cake
When whipping up a decadent air fryer chocolate lava cake, the quality of your ingredients can truly make or break the final product. Here’s everything you’ll need:
-
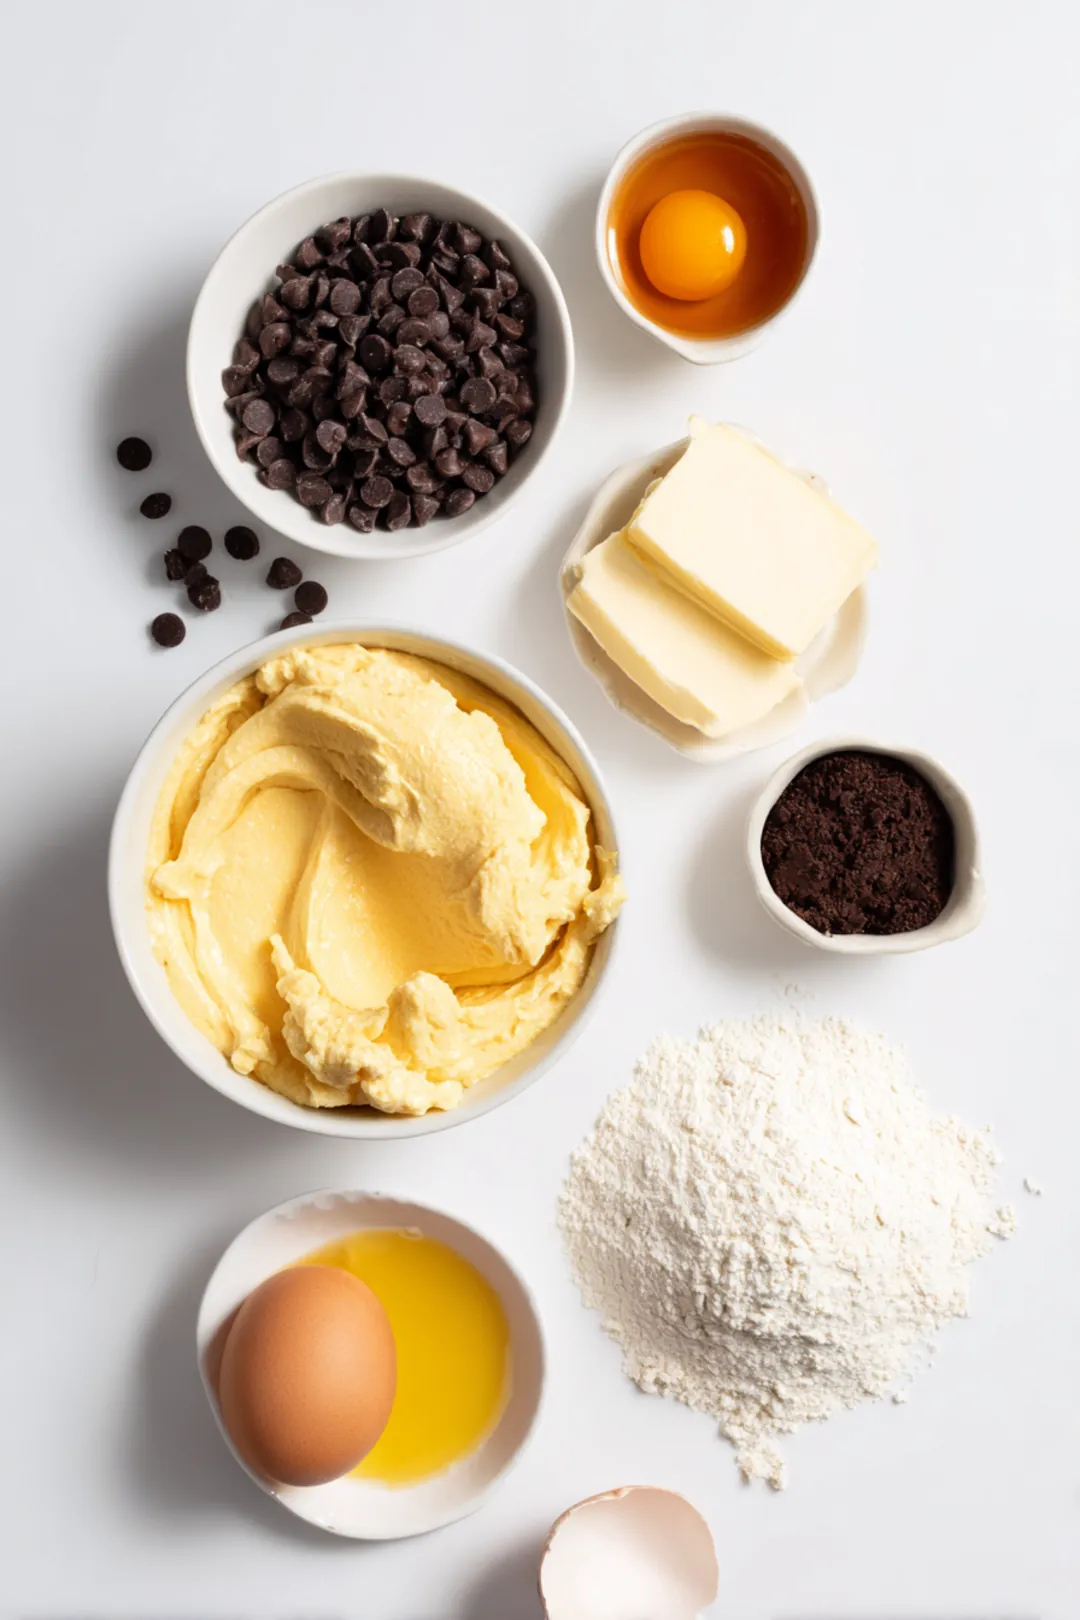
High-quality chocolate (72% cocoa recommended): This provides that rich, deep flavor, crafting an indulgent experience you won’t soon forget.
-
Unsalted butter: Blending beautifully with chocolate, this ingredient ensures a moist, luxurious texture that simply melts in your mouth.
-
Granulated sugar (or coconut sugar for a healthier variation): The sweetness is essential; coconut sugar offers a lower glycemic index while imparting a delightful caramel flavor.
-
Eggs (large): Vital for achieving the perfect rise and creating that signature gooey center we all crave.
-
All-purpose flour (or almond flour for gluten-free): While all-purpose flour is ideal, almond flour works wonderfully for those avoiding gluten, lending a nutty depth that enhances the chocolate beautifully.
-
Vanilla extract: Just a splash will enhance the flavor, rounding out the chocolate with warmth and richness.
-
A pinch of salt: This balances the sweetness and accentuates the chocolate, making every mouthful more delightful.
Optional Ingredients for Flavor Customization
-
Espresso powder: A teaspoon adds a deeper, richer chocolate flavor, elevating the taste to gourmet levels.
-
Sea salt flakes: A sprinkle on top just before serving provides a beautiful contrast to the sweetness of the chocolate.
-
Fresh berries: They offer not only a pop of color but also a refreshing flavor contrast that pairs perfectly with the richness of the cake.
Step-by-Step Instructions
Preparing Your Ramekins
First things first! Lightly grease your ramekins with oil or non-stick spray. For an extra layer of assurance against sticking, dust them with cocoa powder. This little detail can make all the difference when it’s time to pop those lava cakes out!
Melting Chocolate and Butter
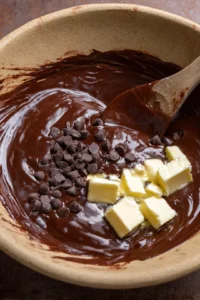
Melt your semisweet chocolate chips and unsalted butter together using either a microwave or a double boiler. Stir until smooth; allow the mixture to cool slightly before proceeding to prevent cooking the eggs. I suggest cooling it for about 5-10 minutes—just long enough to take the edge off without letting it solidify!

Mixing the Batter
In a separate bowl, whisk together the eggs and granulated sugar until frothy. This aeration is crucial — it’s not just for show; it helps create that light, airy texture we all love. Gently fold in your cooled chocolate mixture, then incorporate the flour, vanilla, and salt until just combined. Be careful not to overmix, as this can toughen your cake. Remember, we want that beautiful molten interior!
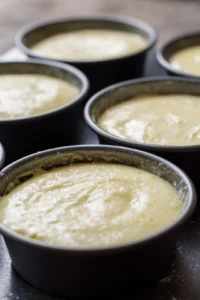
Filling the Ramekins
When filling your ramekins, aim to fill each about three-quarters full. This allows ample room for the cakes to rise without spilling over. Even distribution is key, so use a spoon or small measuring cup for precision. These little details elevate your baking mastery!
Cooking Process
Preheating the Air Fryer
Preheat your air fryer to 350°F (175°C). This step is essential, as it helps achieve that perfect molten center by ensuring the cakes cook evenly from the get-go. Think of it as warming up your oven—it’s setting the stage for success!
Cooking Time and Temperature
Cook your air fryer chocolate lava cakes for approximately 10 minutes. Keep a close eye on them; the magic unfolds quickly! Use a toothpick to check doneness if needed—it should come out with a few moist crumbs clinging to it for that coveted lava effect.
Common Pitfalls to Avoid
Be mindful of a couple of common pitfalls:
-
Overfilling ramekins: An overfilled ramekin can lead to overflow and unwanted mess. Remember, a lava cake should rise, not erupt!
-
Overcooking: This results in a dry cake instead of the gooey ganache center you’re dreaming of. Stay alert!
Serving and Presentation
Ideal Serving Suggestions
Serve these indulgent cakes warm, topped with a generous scoop of vanilla ice cream or a dollop of whipped cream. The warmth of the cake beautifully complements the cold creaminess, creating an exquisite contrast. And don’t forget those fresh berries on the side for an extra burst of flavor and vibrant color that enlivens the dish!
Creative Garnishing Ideas
Let your creative spirit shine through your presentation! Dust the tops lightly with powdered sugar or cocoa for an elegant touch. Consider a drizzle of rich chocolate sauce or salted caramel to amplify the indulgence. A few mint leaves add a touch of color and a refreshing flavor twist, enhancing not only the look but also the taste.
Health-Conscious Variations
Ingredient Substitutions for Healthier Options
For those looking to indulge healthily, swap out regular sugar for coconut sugar. This not only adds a unique flavor but also provides a healthier profile. Additionally, consider using Greek yogurt in place of some butter—this not only reduces fat content but helps maintain moisture. Substitutions don’t have to sacrifice taste!
Guilt-Free Indulgence Tips
Portion control is essential when enjoying this dessert. Aim for smaller servings—after all, it’s about savoring each moment! And keep in mind, dark chocolate boasts health benefits, including antioxidants. As Healthline highlights, “Dark chocolate is loaded with nutrients and antioxidants, making it a healthier choice.” So, indulge a bit more freely!
Chef’s Tips
Common Inquiries about Air Fryer Lava Cakes
Should your lava cakes not turn out as expected, don’t hesitate to troubleshoot. Often, the fix is as simple as adjusting cooking time or temperature.
User Experience Tips
I encourage you to share your experiences with this recipe! What personal twists or flavor variations have you tried? Your feedback not only assists other readers but can spark new baking adventures. After all, the joy of baking grows when we share our successes!
FAQs
Can you make lava cakes in the air fryer?
Absolutely! The air fryer is perfect for this recipe, cooking from all angles and resulting in that soft molten center while maintaining a perfectly crisp exterior.
Is the air fryer a sound substitute for conventional ovens in baking?
You bet! It’s efficient and significantly speeds up cooking times without sacrificing flavor.
Conclusion
Creating a decadent air fryer chocolate lava cake is not only simple, but it also offers a delightful experience that showcases both flavor and texture. Remember, the quality of your ingredients plays a crucial role in crafting this indulgent dessert, so don’t skimp on the chocolate! Pay attention to the details—proper mixing, careful filling, and timed cooking will ensure that molten center you’ve been dreaming of. Whether you prefer a classic approach or a guilt-free variation, there are plenty of ways to make this treat your own.
So gather your ingredients, fire up that air fryer, and savor every rich, gooey bite. Happy baking, friends! Remember, even the simplest pleasures can bring the most joy—especially when they’re as delicious as this lava cake.
Decadent Air Fryer Chocolate Lava Cake Recipe
Ingredients
Method
- In a mixing bowl, melt the semisweet chocolate chips and unsalted butter together in the microwave, stirring until smooth.
- Add in the egg, egg yolk, and sugar to the chocolate mixture. Whisk until fully combined. Then, stir in the vanilla extract and flour until just mixed.

- Pour the batter into two greased ramekins. Preheat the air fryer to 350°F (180°C) and cook the lava cakes for 10 minutes. Let them rest for 1-2 minutes before serving.