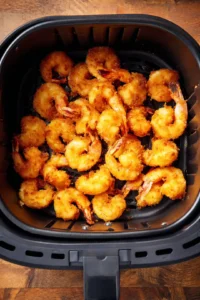
Crispy Air Fryer Thai Coconut Shrimp Recipe!
Are you ready to transform your dinner routine into something truly extraordinary? This Air Fryer Thai-style coconut shrimp is not just a meal; it’s a culinary adventure that will make your taste buds dance and impress your family and friends!
In this guide, I’ll be sharing my foolproof tips and techniques to achieve that irresistible crispy bite—all while harnessing the magic of the air fryer. From selecting the perfect shrimp to crafting a delightful dipping sauce, we’ll uncover the secrets to mastering this tropical delight. So, grab your apron and let’s get cooking!
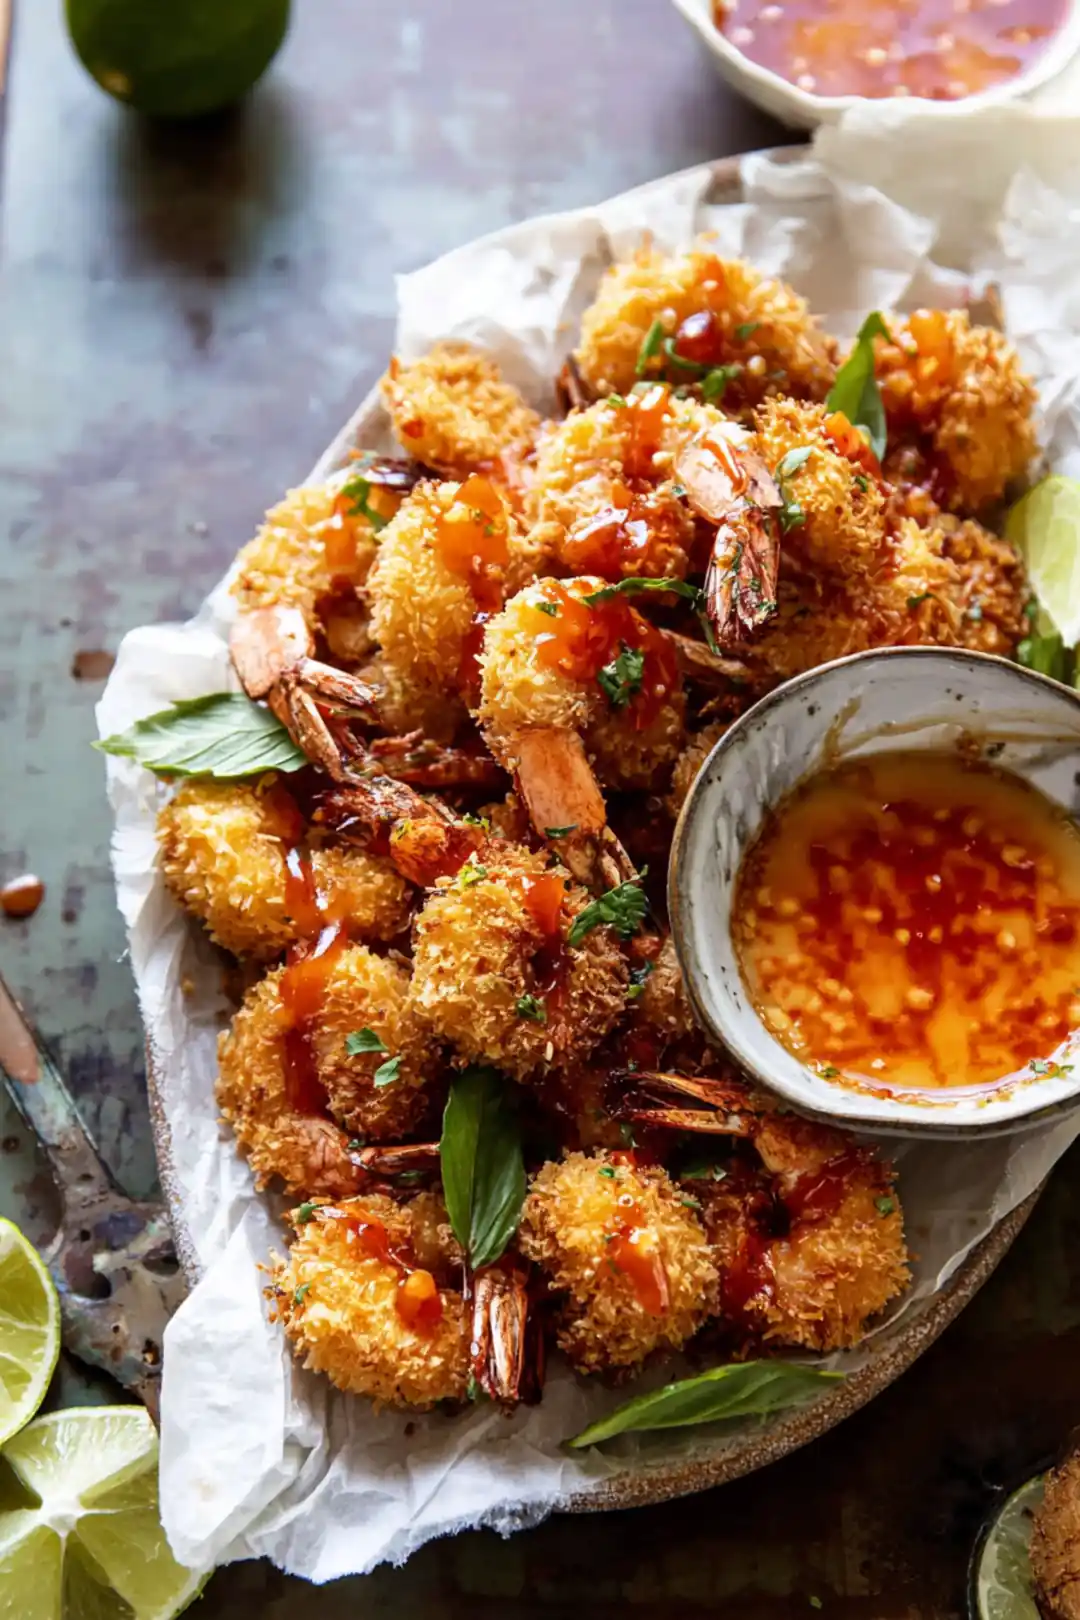
Table of Contents
What To Remember
These essential tips will help you master the art of Crispy Air Fryer Thai Coconut Shrimp and elevate your cooking game. Trust me, the difference is in the details!
-
Choosing the Right Shrimp: Opt for medium to large shrimp with tails-on for the best texture. Their size holds up beautifully in the air fryer, delivering a perfect bite every time!
-
Perfecting the Coating: For an irresistible crunch, double-coat the shrimp. First, dip them in egg, then roll them in a mixture of panko breadcrumbs and shredded coconut. This dynamic duo adds an amazing texture that contrasts beautifully with the juicy shrimp inside.
-
Air Fryer Calibration: Each air fryer has its quirks, so start with a cooking time of 8 minutes at 375°F, flipping halfway to ensure even crispiness. Don’t hesitate to adjust based on how your specific model performs! In my kitchen, I’ve found that some models may need an extra minute or two, so keep an eye out for that golden color.
-
Dipping Sauce Fusion: While sweet chili sauce is a classic, don’t hesitate to try a tangy mango salsa or a spicy peanut sauce to bring a new dimension of flavor to your dish. It’s all about creativity—get adventurous! I always recommend making a small batch of each sauce to see what pleases your palate the most.
-
Perfect Pairings: These shrimp shine when served with a side of jasmine rice or a crunchy cucumber salad. The lightness of these sides balances the richness of the coconut shrimp wonderfully. I love to add fresh herbs to the salad for an extra burst of flavor! You can even consider pairing it with Air fryer Greek lamb meatballs for a delightful spread.
-
Make-Ahead Magic: If you prep the shrimp in advance, store them uncooked in the fridge. Just remember to coat them right before cooking to maintain that crispy finish.
-
Avoiding Excess Moisture: Be sure your shrimp are patted dry before coating! This simple step prevents soggy breading, ensuring maximum crunch. It’s a quick and easy fix that makes a world of difference.
Ingredients You’ll Need
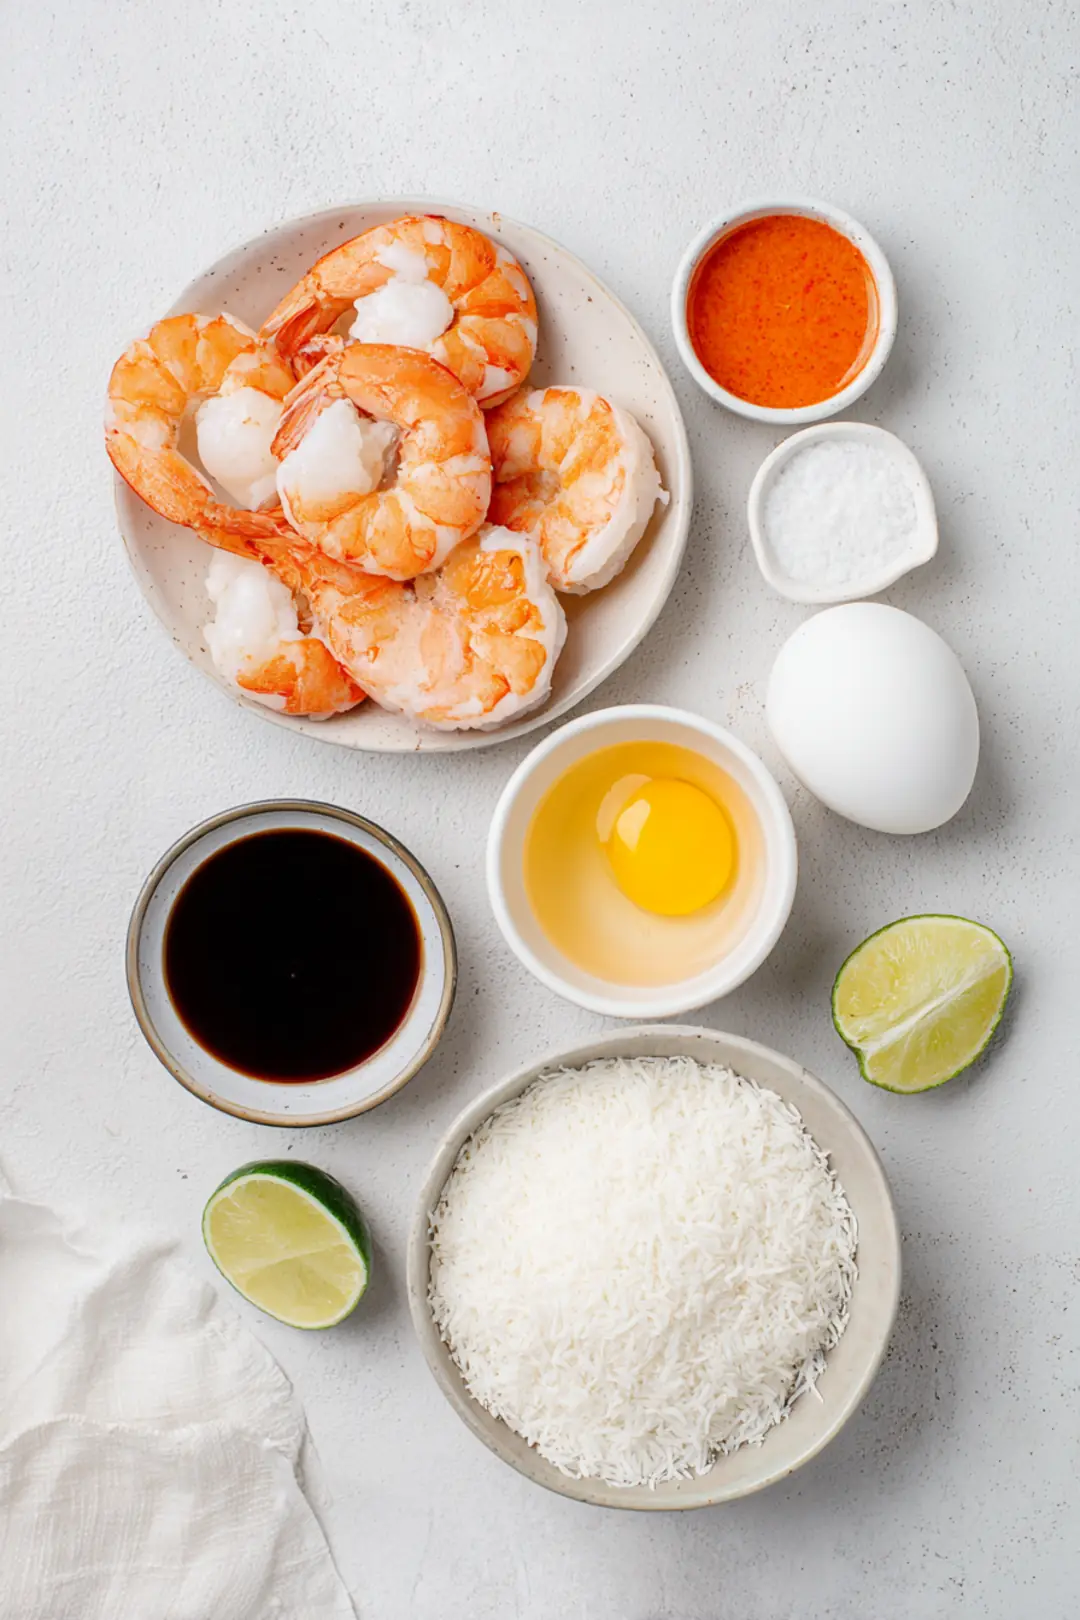
Essential Shrimp Ingredients
-
Medium to large shrimp: For the most satisfying bite and texture, go for large shrimp. Their size ensures a juicy interior, making every bite a delight.
-
Fresh vs. frozen shrimp: While fresh shrimp can be a joy, don’t shy away from frozen varieties. They’re often flash-frozen right after catch and can be just as delicious—just ensure to thaw them properly. The best method? Place them in the refrigerator overnight or run them under cold water for a quick thaw. This care preserves their flavor and avoids mushiness. If you’re in a hurry, a quick soak under cold water works wonders!
Coating Mixture
-
Panko breadcrumbs: Ah, the magic of panko! This secret weapon delivers that coveted crunch. Panko is lighter and airier than traditional breadcrumbs, resulting in a delightful texture—so be sure to use plain panko to keep the flavors uncomplicated.
-
Shredded coconut: You can choose between sweetened and unsweetened shredded coconut. Sweetened adds a lovely contrast to the savory shrimp, while unsweetened keeps things on the drier side. Quick tip: if you want to control the sweetness, go with unsweetened!
Dipping Sauces
-
Classic options: Sweet chili sauce is a must! Its balanced sweetness and slight heat create a harmonious blend with the crispy shrimp. You won’t be able to resist that tantalizing Thai flavor!
-
Alternative suggestions: Want to shake things up? Try mango salsa for a fruity twist or a spicy peanut sauce for those craving a kick. These alternatives enhance the dish while providing a fun range of textures and flavors for your palate. You might also enjoy it with Air fryer Mexican street corn (Elote) as a unique touch.
Step-by-Step Preparation
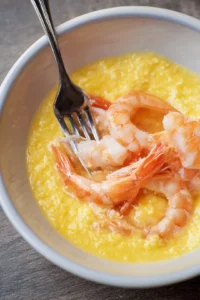
1. Preparing the Shrimp
-
Thawing and cleaning shrimp: Begin by rinsing your shrimp under cold water. If they’re still a bit icy, allow them to warm at room temperature for a few minutes. This step can really amplify their flavor and texture.
-
How to peel and devein shrimp: If your shrimp aren’t already prepped, simply grip the shell and pull it off—leaving the tail on for that classic presentation. For deveining, use a small knife to carefully lift out the dark vein along the back. Well-prepped shrimp ensure a delightful taste experience! Remember, a sharp knife makes this quick and easy.
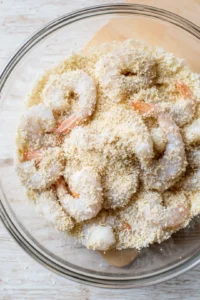
2. Creating the Coating
-
Egg wash technique: Whisk one large egg until smooth; this will be your glue for the coatings. Fully immerse each shrimp for an even layer.
-
Mixing panko and coconut: Combine equal parts panko breadcrumbs and shredded coconut in a bowl. The airy texture of panko complements the chewy coconut perfectly, resulting in a scrumptious coating.
3. Coating the Shrimp
-
Double-coating method: Want an extra crunch? Consider a double dip! First, dunk each shrimp in the egg wash, then coat them in the panko-coconut mixture. Repeat for a thicker, more satisfying crust.
-
Tips for keeping the coating intact during cooking: Allow your coated shrimp to rest for a few minutes before air frying. This waiting period helps the coating set, ensuring it remains intact during cooking.
Air Frying Technique
1. Preheating the Air Fryer
-
Importance of preheating: Preheating your air fryer is essential for an even cook and for quickly sealing in that crispy texture. While it warms up, finish prepping your shrimp!
-
Ideal temperature and settings: Set your air fryer to 400°F (200°C). This temperature is perfect for achieving that golden brown crunch, leading to perfectly crispy and juicy shrimp.
2. Cooking Time and Techniques
-
Cooking in batches: Avoid overcrowding your basket! While it’s tempting to throw everything in at once, this can lead to steaming instead of frying. A single layer ensures the best results.
-
Flipping the shrimp: About halfway through (5-6 minutes in), flip your shrimp to ensure they get that desirable crispness on both sides. This small step makes a big difference!
Enhancing the Meal
1. Perfect Pairings
-
Recommended sides: Serve your coconut shrimp alongside jasmine rice or a refreshing cucumber salad. These light sides perfectly balance the rich flavors of the shrimp, providing satisfaction without being overwhelming. Another excellent pairing could be Air fryer falafel with tahini for a delicious contrast.
-
Flavor balance: Brighten the dish with a squeeze of fresh lime for delightful bursts of freshness! I often have extra lime wedges on hand for those who want an additional kick of zesty goodness.
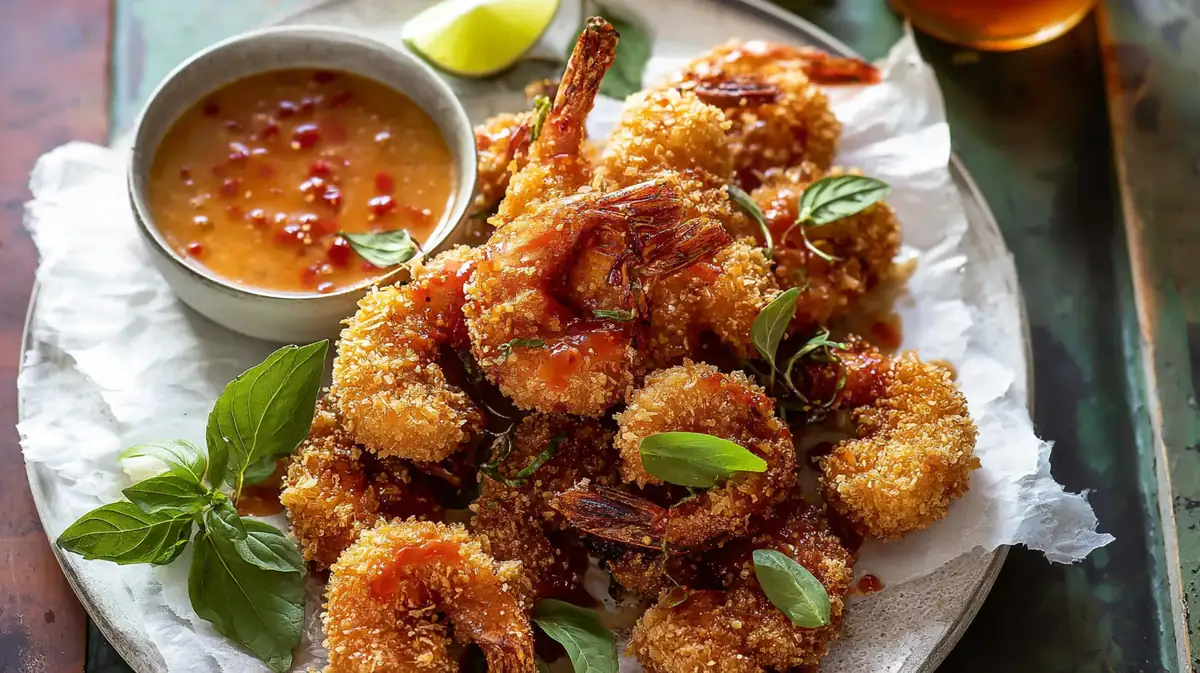
2. Dipping Sauce Fusion
-
More sauce ideas: Feel free to get creative with your sauces! A spicy peanut sauce or a homemade lime vinaigrette can be delicious complements.
-
How to serve: Presentation is key! Serve your crispy shrimp on a vibrant plate with a small bowl of sauce for dipping—trust me, your guests will appreciate the extra effort!
Tips for Success
1. Common Mistakes to Avoid
-
Preventing soggy breading: Always pat shrimp dry before coating; moisture can ruin that delicious crunch you’ve worked hard for.
-
Overcooking: Keep a watchful eye on your shrimp—overcooking can lead to toughness and rubberiness. The perfect cook should feel slightly firm with that lovely golden hue.
2. Make-Ahead Storage
-
Storing uncooked shrimp: If you’re prepping ahead, keep uncooked shrimp in the fridge and aim to use them within a day for optimum freshness.
-
Freezing options: For long-term storage, flash freeze individually placed shrimp on a baking sheet before transferring to a zip-top bag. This method preserves their quality and integrity.
3. Cooking Variations
-
Experimenting with spices: Add a pinch of cayenne or smoked paprika to your coating mix for an extra flavor kick. A simple switch can create wonderful layers of flavor!
-
Alternative cooking methods: While an air fryer is fantastic, you can bake at 425°F for about 15 minutes for similar crisp results. Taste test both methods and embrace your inner chef to discover what suits your preference best!
Nutrition Insights
1. Health Benefits of Using an Air Fryer
-
Lowering fat intake: “Air frying drastically reduces the need for oil, allowing you to enjoy your favorite foods with less fat.” (USDA) This transformation makes your crispy coconut shrimp a healthier option, so you can indulge without guilt.
2. Customizing for Dietary Needs
-
Gluten-free alternatives: Looking for gluten-free options? Swap out panko for gluten-free breadcrumbs or crushed rice crackers easily.
-
Vegan adaptations: For a plant-based twist, substitute shrimp with marinated crispy tofu or jackfruit, and enhance your sauces with nutritional yeast for that cheesy flavor without dairy.
FAQ
What is the best way to cook coconut shrimp in an air fryer?
The best way is to preheat your air fryer to 400°F (200°C), arrange the shrimp in a single layer, and cook for about 8–10 minutes until golden and crispy, flipping halfway for even cooking.
How long does it take to air fry coconut shrimp?
Typically, air frying coconut shrimp takes 8 to 10 minutes at 400°F (200°C), ensuring a crispy texture while maintaining the shrimp’s flavorful essence.
What sauce goes well with coconut shrimp?
Coconut shrimp pairs beautifully with various dipping sauces. Sweet chili sauce, mango salsa, or a tangy lime aioli are popular choices that enhance the tropical flavors.
Can you make coconut shrimp ahead of time?
Absolutely! You can prepare the coconut shrimp ahead of time by coating them and refrigerating, but it’s best to cook them fresh for that optimal crispiness.
What are the health benefits of using an air fryer for cooking shrimp?
Using an air fryer significantly reduces oil consumption, making dishes like coconut shrimp healthier. It also helps retain nutrients due to shorter cooking times while achieving that satisfying, crispy texture.
Conclusion
And there you have it—a delightful recipe for crispy Thai coconut shrimp that’s easy to master, regardless of whether you’re an air fryer novice or seasoned pro. Remember to pay attention to shrimp quality, and don’t underestimate the magic of panko and coconut for that satisfying crunch. With just a few minutes of prep work—thawing, coating, and proper cooking techniques—you’ll be indulging in a dish that’s both golden and juicy.
Got a party coming up? These shrimp make a fantastic appetizer that will leave everyone smiling! So roll up your sleeves, embrace your inner chef, and make science taste like comfort in your very own kitchen. Happy frying!
Crispy Air Fryer Thai Coconut Shrimp Recipe!
Ingredients
Method
- In a bowl, whisk together the egg, then dip each shrimp into the egg mixture, ensuring they are well coated.
- In another bowl, mix the panko breadcrumbs and coconut flakes. Coat the shrimp in this mixture, pressing it onto the shrimp to ensure a good coating.
- Preheat your air fryer to 400°F (200°C). Place the coated shrimp in the air fryer basket in a single layer. Cook for 10-12 minutes until they are golden brown and crispy, flipping halfway through.