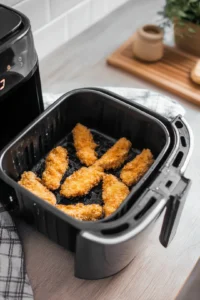
Crispy Air Fryer Chicken Katsu: A Healthier Delight!
Crispy, golden, and oh-so-satisfying! What if I told you that making the perfect chicken katsu could be healthier and easier than ever? Picture this: a flavorful crunch that graces your dinner plate in under 30 minutes!
In this post, I’ll guide you through the art of creating Air Fryer Japanese Chicken Katsu that delivers all the crispy goodness you crave without the guilt. From perfecting the tenderness of your chicken to exploring fun sauce variations, you’ll learn all the secrets to impress yourself and anyone lucky enough to share the meal. Let’s embark on this delightful journey where flavor meets convenience!

Table of Contents
Why You’ll Love This Recipe
These tips and tricks will elevate your air fryer chicken katsu experience, ensuring you nail the crispiness and flavor every time. Whether you’re a busy parent or just looking for a hassle-free dinner option, these nuggets of wisdom will transform your weeknight meals and satisfy your cravings.
- Perfect Pounding: Don’t skip the tenderizing step! Gently pound the chicken breast to an even thickness; this helps it cook uniformly and keeps it juicy. You’ll love the texture even more!
- Cornstarch Magic: Before dredging your chicken, a light dusting of cornstarch enhances the crispiness that we adore in katsu. Just a tablespoon will do wonders for that satisfying crunch. I like to use a sieve for even distribution—less mess, more success!
- Egg Wash Tips: When using the egg wash, take your time—allow any excess to drip off before moving to the breadcrumbs. This method ensures the exterior fries up beautifully without being soggy.
- Sauce Exploration: While traditional katsu sauce is divine, don’t hesitate to get creative! Sweet chili sauce or tangy ponzu can add a delightful twist—exploring flavors keeps your meals exciting!
- Batch Cooking Bonus: Make extra katsu and store it in the fridge for quick lunches. Just reheat in the air fryer for a few minutes—they’ll crisp right back up!
- Sides Matter: Serve your katsu with a side of fresh cabbage slaw or steamed rice drizzled with sesame oil. These sides balance the rich flavor and add a refreshing crunch! You might also enjoy pairing it with some Air fryer Greek lamb meatballs for an even more satisfying meal.
- Watch Your Timing: Every air fryer is different; keep an eye on your katsu in the last few minutes to avoid overcooking. The golden brown color is your guide to crispy perfection! Remember, if they start to smell too toasty, they might be overdone—trust your nose!
Ingredient Benefits
Why Chicken Breasts?
Using boneless, skinless chicken breasts not only provides a lean source of protein but also ensures the dish remains light. They absorb flavors beautifully and, when cooked properly, offer that tender bite we all crave.
The Magic of Panko
Panko breadcrumbs are the secret weapon behind that signature crispiness of chicken katsu. They are lighter and airier than traditional breadcrumbs, creating the perfect crunch without adding too many calories.
“Whole grains, such as oats and whole grain bread crumbs, can help us feel fuller longer, and they also provide fiber that can improve digestive health.”
— Healthline
Since we’re using panko, we’re aiming to get that delightful crisp while keeping our health-conscious mindset.
Flavor Elevation
Adding in optional ingredients like garlic powder or sesame oil not only enhances the dish’s depth but also brings along additional health benefits. Garlic is known for its immune-boosting properties, while sesame oil contains healthy fats that support heart health.
Step-by-Step Instructions
Preparing the Chicken
Start by firmly, yet gently, pounding the chicken to an even thickness. Trust me, this isn’t just therapeutic; it promotes even cooking and a delightful texture. Once that’s done, seasoning with salt and pepper is non-negotiable—this is your chance to imbue each piece with flavor!
The Breading Process
Now, cornstarch is a tiny yet mighty hero in this recipe! A light dusting helps the egg wash cling better. When you’re ready to coat with the panko, press gently to ensure every morsel is covered. That’s where your crispy dreams begin!

Air Frying Techniques
Preheat that air fryer—you’ll thank me later! Cooking in single layers ensures hot air circulates around each piece, leading to a uniform and crispy finish. Keep a meat thermometer handy to monitor the internal temperature; nobody enjoys dry chicken! Consider pairing your chicken katsu with Air fryer frozen samosas for a fun and filling dinner.

Sauce and Flavor Variations
Sauces that Sing
A classic katsu sauce never fails, but don’t hesitate to wander into more adventurous territory. Sweet chili sauce adds a delightful kick, transforming the humble chicken katsu into a flavor explosion that’s simply unforgettable!
Spice and Herby Kick
Feeling feisty? Throw in a pinch of cayenne or create an herbed version by mixing rosemary or thyme into the panko. These little tweaks can elevate your meal and surprise your taste buds.
Serving Suggestions
Perfect Partners on the Plate
A light cabbage slaw or even a scoop of steamed rice pairs beautifully, complimenting the crunchy chicken with fresh, vibrant crunchiness. Consider adding a refreshing salad with citrus notes to brighten your meal, or even Air fryer Thai-style coconut shrimp for an exotic twist.
Dressing Up the Plate
Presentation can make a huge difference! Slice the katsu into strips and serve with a ramekin of your dipping sauce. A sprinkle of sesame seeds or freshly chopped green onions makes the dish pop visually and adds a delightful crunch.
Cooking Tips and Troubleshooting
Avoiding Common Pitfalls
Don’t overcook! That dark crust or dry look is a warning sign. Trust the timing and keep an eye on the cooking process.
Keeping It Fresh
If your katsu loses its crispness, overcrowding is often the culprit. Allow each piece its moment to shine in the air fryer!
Storage and Reheating Tips
Meal Prep Wins
Think ahead and make a double batch; it’ll save you on those busy weeknights. Store it properly, and it’ll last for about three days in the fridge.
Bringing Back the Crisp
When you’re ready to enjoy leftovers, the air fryer is your best friend. Just a few minutes at the right temperature will revive that crunchy exterior.
Nutritional Insights
Health Benefits of Air Frying
Air frying not only delivers a delicious meal but also trims down fat and calories significantly—who said healthy eating couldn’t be delicious?
Dietary Customization
Want it gluten-free? Swap in gluten-free breadcrumbs without a hitch. And don’t shy away from experimenting with different proteins! Pork and tofu can both be excellent substitutes, ensuring everyone at the table enjoys a satisfying meal. Try making Air fryer Italian chicken parmesan for another tasty alternative.
FAQs
What is the best way to cook chicken katsu in an air fryer?
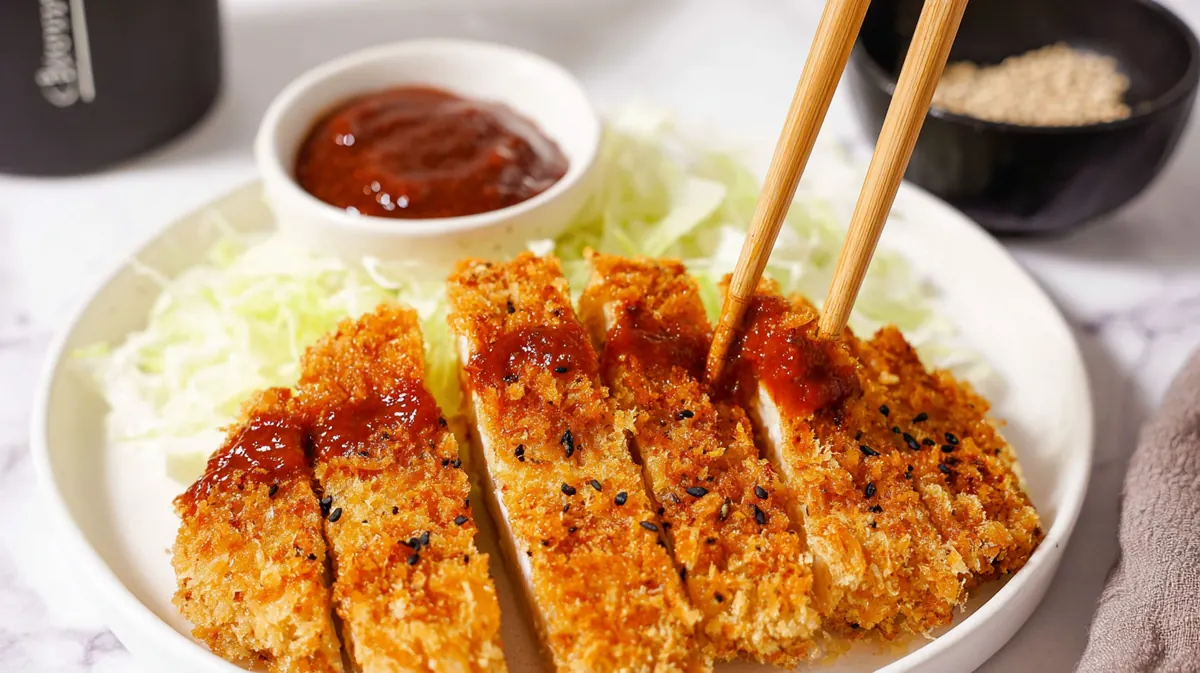
The optimal way to cook chicken katsu in an air fryer is by first breading the chicken with panko. Preheat the fryer to 380°F (190°C) and cook for 12-15 minutes, flipping halfway through, until golden brown and crispy. This method yields a healthier version without sacrificing crunch.
What sauces go well with chicken katsu?
Chicken katsu pairs beautifully with traditional tonkatsu sauce, which offers a sweet and tangy blend. Other fantastic options include spicy mayo, teriyaki sauce, or even a zesty ponzu for a refreshing kick. Experiment with different sauces to uncover your favorite!
How long should I cook chicken katsu in an air fryer?
Cook chicken katsu in an air fryer for about 12-15 minutes at 380°F (190°C). Turning the chicken halfway through ensures even cooking, resulting in a perfectly crispy exterior while keeping the inside tender and juicy.
Can I use other meats for katsu?
Absolutely! You can use other meats like pork or even tofu for katsu. Simply follow the same breading technique, adjusting the cooking time based on the thickness of the meat. Air frying provides a deliciously crispy result, no matter your choice!
What sides pair well with chicken katsu?
Chicken katsu goes wonderfully with various sides, such as steamed rice, salad, or noodles. You can also serve it with pickled vegetables for an authentic touch. Pairing it with miso soup can elevate the meal even further!
Conclusion
Cooking doesn’t have to be complicated, and this crispy air fryer chicken katsu proves just that! By utilizing lean chicken breasts and the magical crunch of panko, you can whip up a healthier delight that’s packed with flavor. Don’t forget the power of seasoning and that light dusting of cornstarch for that perfect crisp—just a few simple steps can transform your dinner routine. Whether you stick to traditional dipping sauces or venture into spicier flavors, this dish is as versatile as it is delicious.
So, gather your ingredients, take a deep breath, and remember: every meal is an opportunity to create something wonderful—even on a busy Tuesday night! Challenge yourself to experiment with new flavors, and enjoy the delightful crunch of your homemade air fryer chicken katsu! Happy cooking, my friends!
Crispy Air Fryer Chicken Katsu: A Healthier Delight!
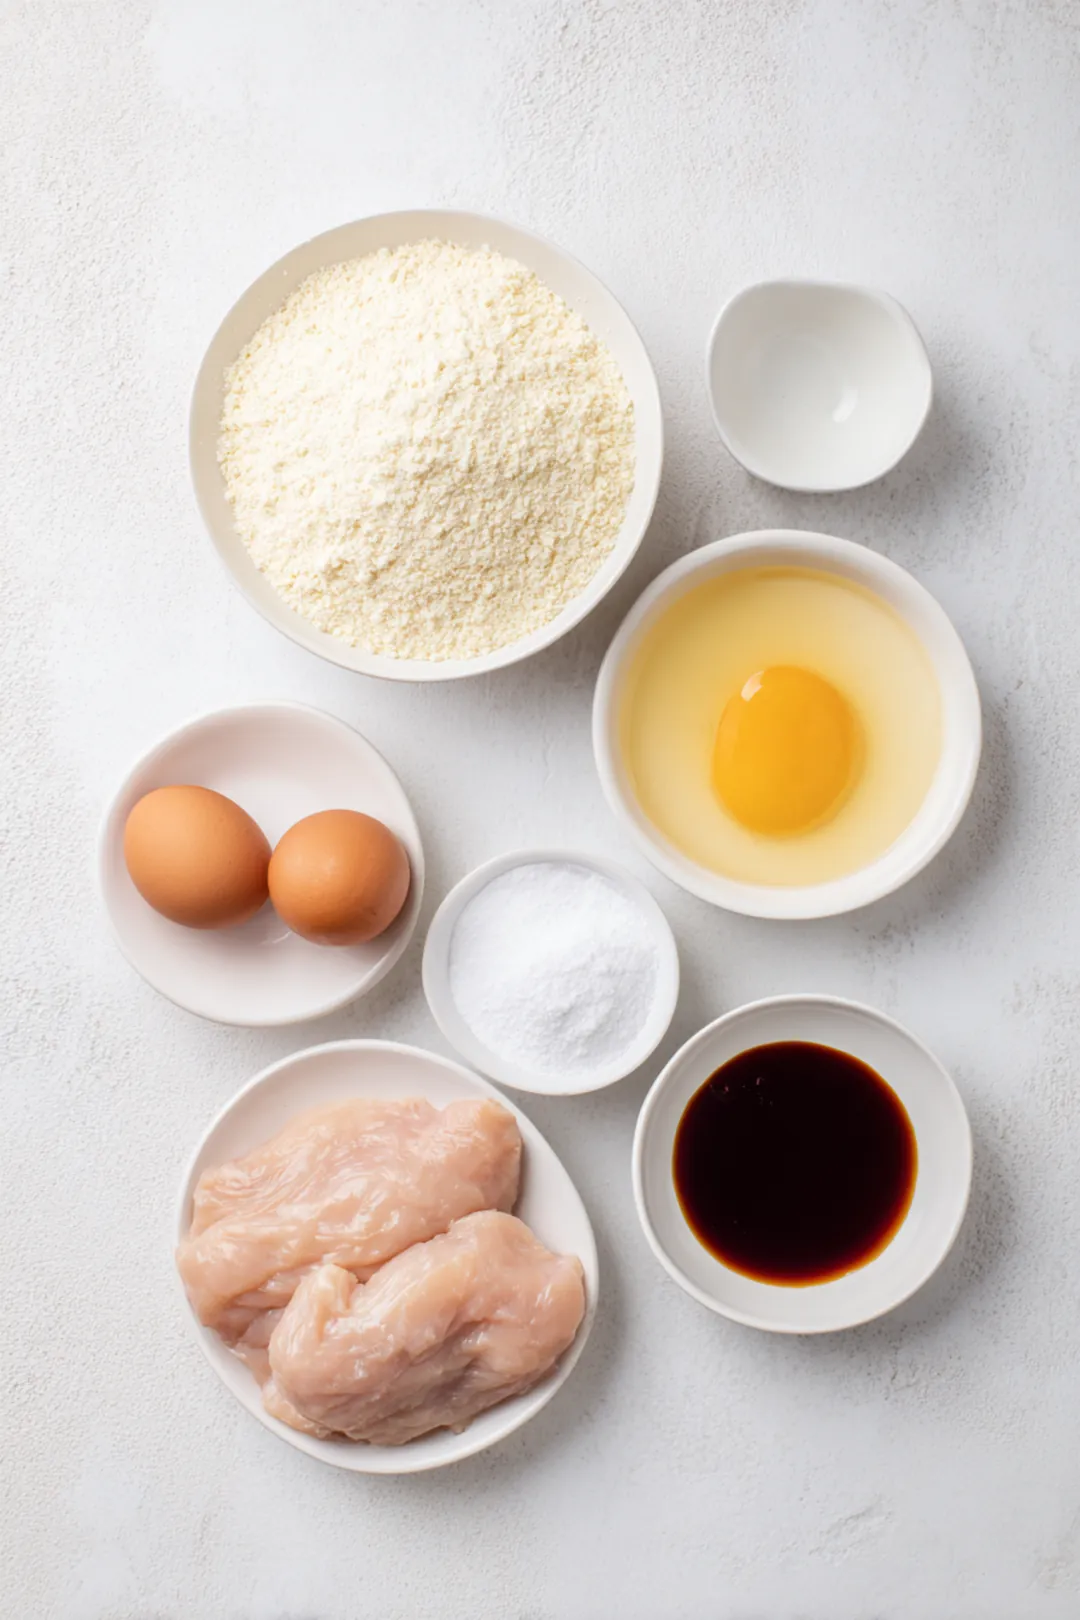
Ingredients
Method
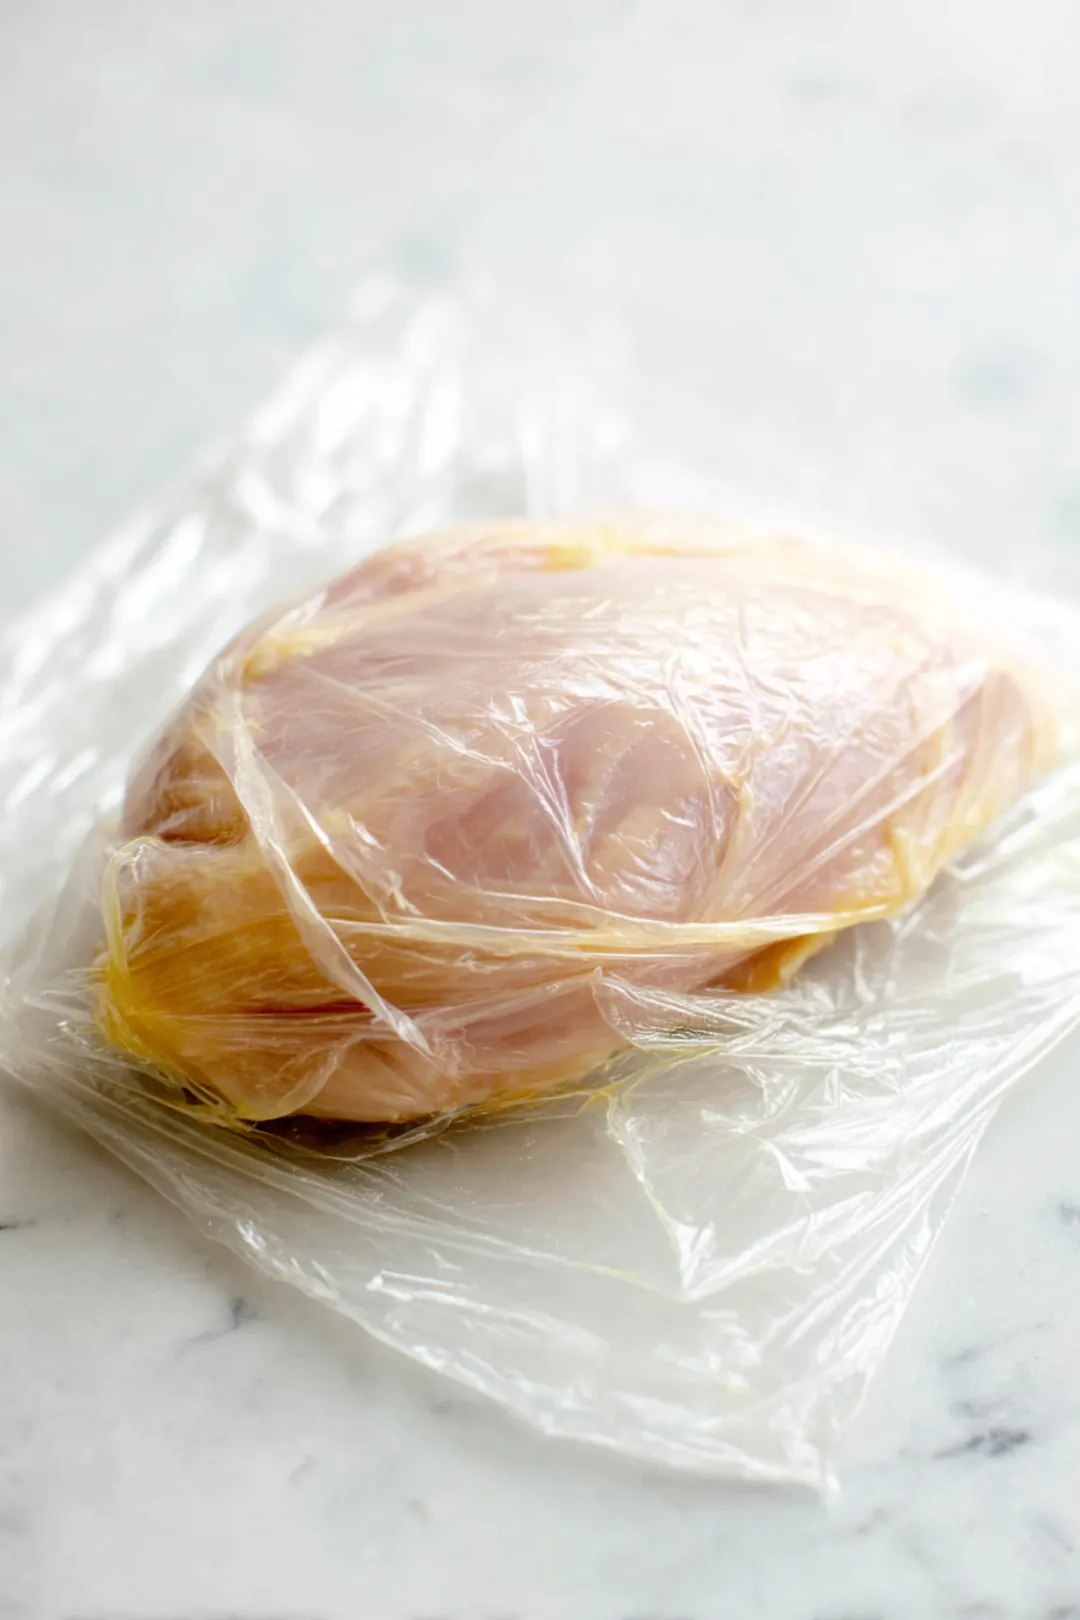
- Begin by preparing your chicken breasts. Place them between two pieces of plastic wrap and pound them to an even thickness of about 1/2 inch for best cooking results.

- Season the chicken with salt and pepper, then coat each piece in flour, dip it in the beaten egg, and finally cover it with panko breadcrumbs until well coated.

- Preheat your air fryer to 380°F (193°C). Arrange the breaded chicken in the air fryer basket in a single layer, making sure they do not overlap. Cook for 10 minutes, flip, and cook for an additional 10 minutes until golden brown and crispy.