Mastering Burnt Basque Cheesecake: Tips & Variations!
What if I told you that the secret to a heavenly dessert lies in mastering a burnt exterior? The Burnt Basque Cheesecake is not just a cheesecake; it’s an edible canvas waiting for your unique twist. Join me, Chef Jason Walker, as we embark on a delicious journey to create this indulgent treat. In this guide, I’ll share expert tips and delightful variations that will transform your cheesecake game from ordinary to extraordinary. Let’s get ready to impress your guests and relish every bite of this caramelized masterpiece!
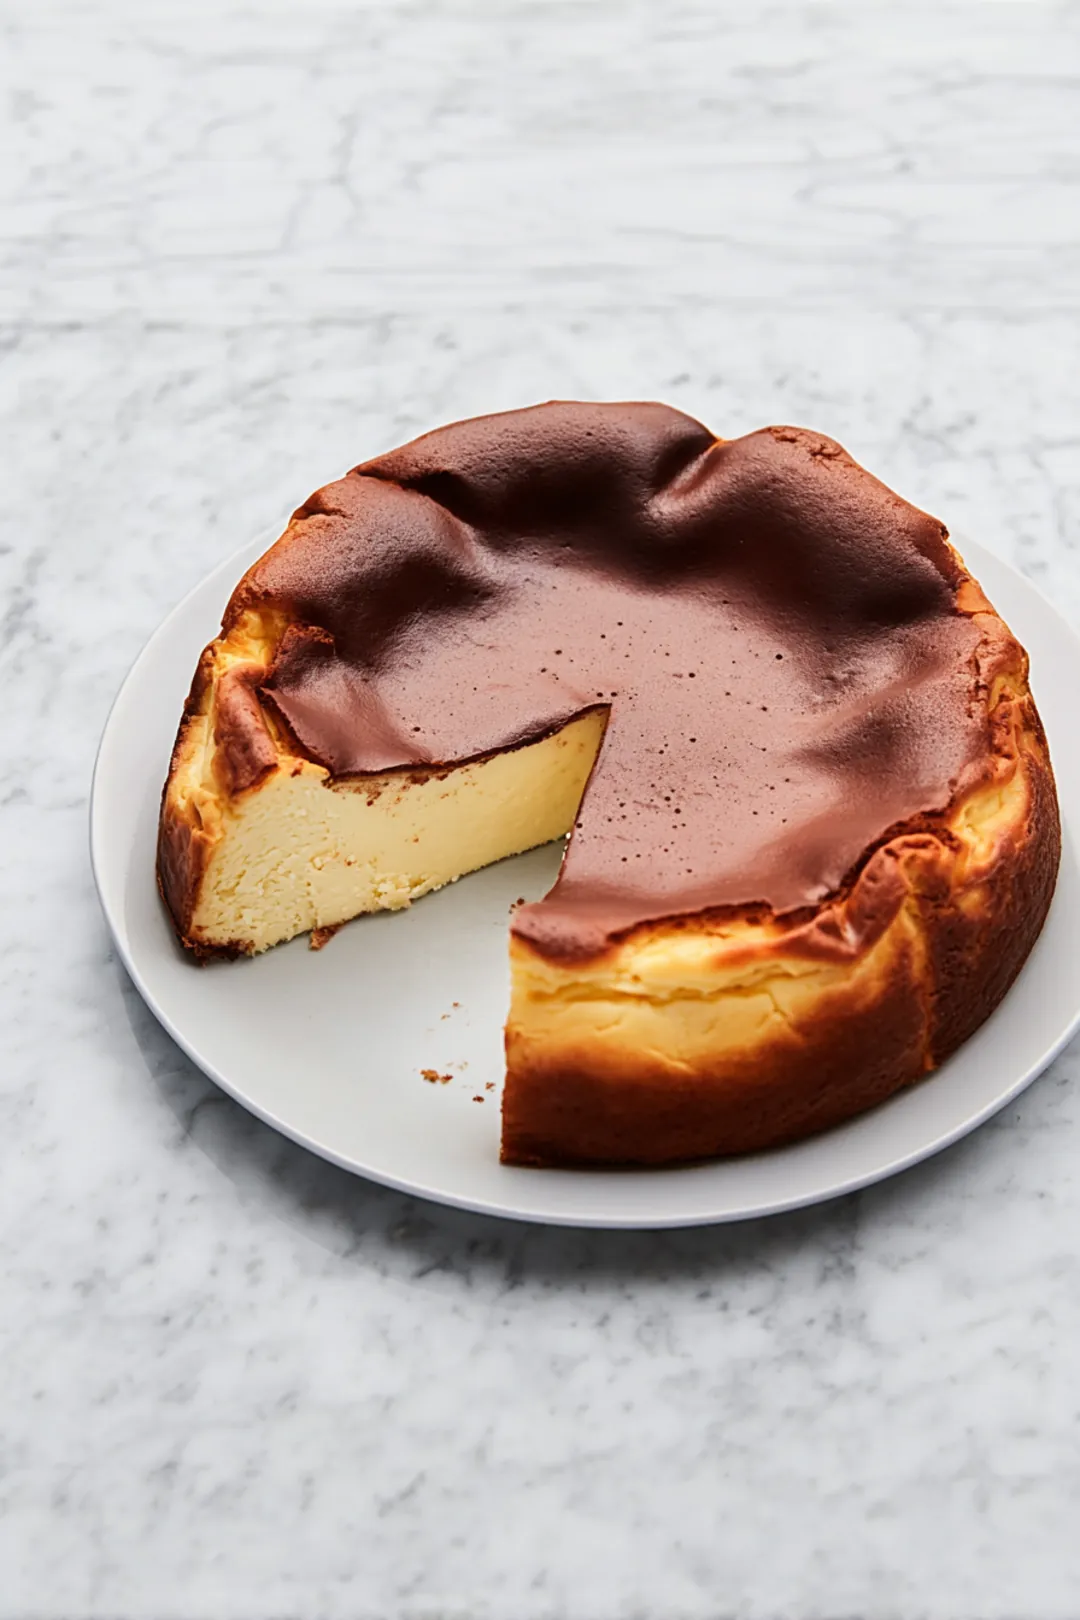
Table of Contents
Why You’ll Love This Recipe
Mastering the art of Burnt Basque Cheesecake is not simply about following a recipe; it’s a delightful dance of precision and creativity. This unique dessert offers a wonderful playground for culinary experimentation. Here are some insider tips that will elevate your cheesecake game and ensure your culinary adventure is both successful and delicious!
-
Ingredient Quality: Always use high-fat cream cheese for that rich, melt-in-your-mouth texture. Brands like Philadelphia yield the best results, but don’t hesitate to explore local artisanal cream cheeses—they can add unique flavor profiles! I once tried a small-batch goat cheese that lent a beautiful tang; this delightful contrast enhanced the overall creaminess and depth. So go ahead, mix it up!
-
Room Temperature Matters: Allow your ingredients to reach room temperature before mixing. This step is crucial for ensuring a smooth batter free from lumps, which helps create a perfectly creamy cheesecake that sets beautifully. I usually set my cream cheese out an hour before baking; it’s amazing how this small technique can significantly improve the texture!
-
Whip It Right: When blending the batter, aim for fluffy rather than airy. Overmixing can incorporate too much air, causing unwanted cracks during baking; we want caramelized perfection, not vulnerable fissures! Remember, the goal here is to achieve a silky consistency that’s worthy of the dessert’s reputation.
-
Trial & Error with Heat Settings: Each oven behaves differently, so adjustments may be necessary. A good starting point for the air fryer is around 320°F — keep a close eye, as your aim is that gorgeous, dark exterior without any burnt bitterness. Check your cheesecake a few minutes before the recommended time; this helps you catch it at that perfect moment when it’s just set and beautifully caramelized. If you’re curious about other air fryer creations, try an air fryer viral sandwich to get the hang of it!
-
Flavor Variations: Don’t shy away from infusing seasonal flavors—think pumpkin spice for fall or fresh berries for summer. These vibrant additions can bring new life to your cheesecake. Just be mindful to reduce the sugar slightly to balance out the extra sweetness and adjust baking time if you’re adding significant moisture!
-
Chill for Flavor: After cooling, let your cheesecake set in the fridge for at least four hours (or overnight, if you can wait!). This resting period deepens the flavors and helps achieve that rich, intoxicating texture we all crave.
-
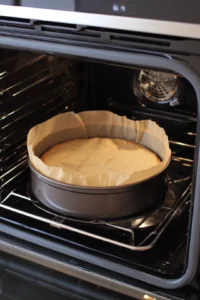
Avoiding the Soggy Bottom: If you’re using a springform pan, be sure to line the bottom with unbleached parchment paper and lightly oil the sides. This approach ensures easy removal and keeps your crust intact—a chef’s secret for achieving plating perfection!
These tips will help you master your Burnt Basque Cheesecake, making it a showstopper at any gathering. Now, let’s dive into the recipe steps and create something extraordinary!
The Delicious Background of Burnt Basque Cheesecake
The Origin Story
Let’s start with a trip to Spain—specifically, the Basque region, where the Burnt Basque Cheesecake, or Tarta de Queso, first gained popularity. This delightful culinary gem emerged from a rustic kitchen in San Sebastián, and locals cherish not only the unique flavor but also the rich story behind it. This cheesecake reflects the Basque culture’s love for simple yet sumptuous cuisine. Its charm lies in its delightful imperfections, a hallmark of Basque storytelling itself—messy, yet utterly delicious, resonating with the passion of its creators.
Why It’s Unique
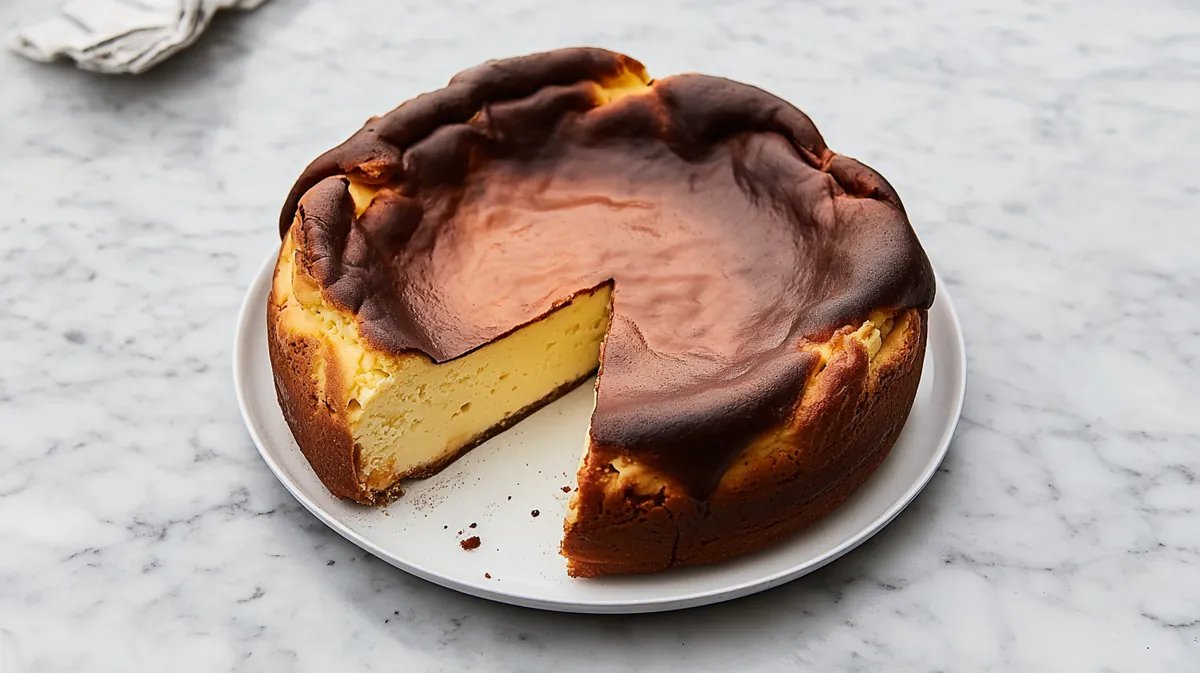
What sets the Burnt Basque Cheesecake apart from traditional cheesecakes? It’s all in the texture and that beautifully charred top! When baked at a high temperature, the outside develops a sumptuous caramelized crust, while the inside remains rich, creamy, and slightly jiggly. This delightful contrast creates a tantalizing experience for the palate. Remember, it’s this intentional ‘burnt’ exterior that not only adds flavor but sets the stage for the luscious creaminess within. As food writers often note, “it’s the ‘burnt’ that makes the Basque cheesecake truly unique” when compared to its more straightforward cheesecake cousins.
Essential Ingredients for Your Cheesecake
The Main Players
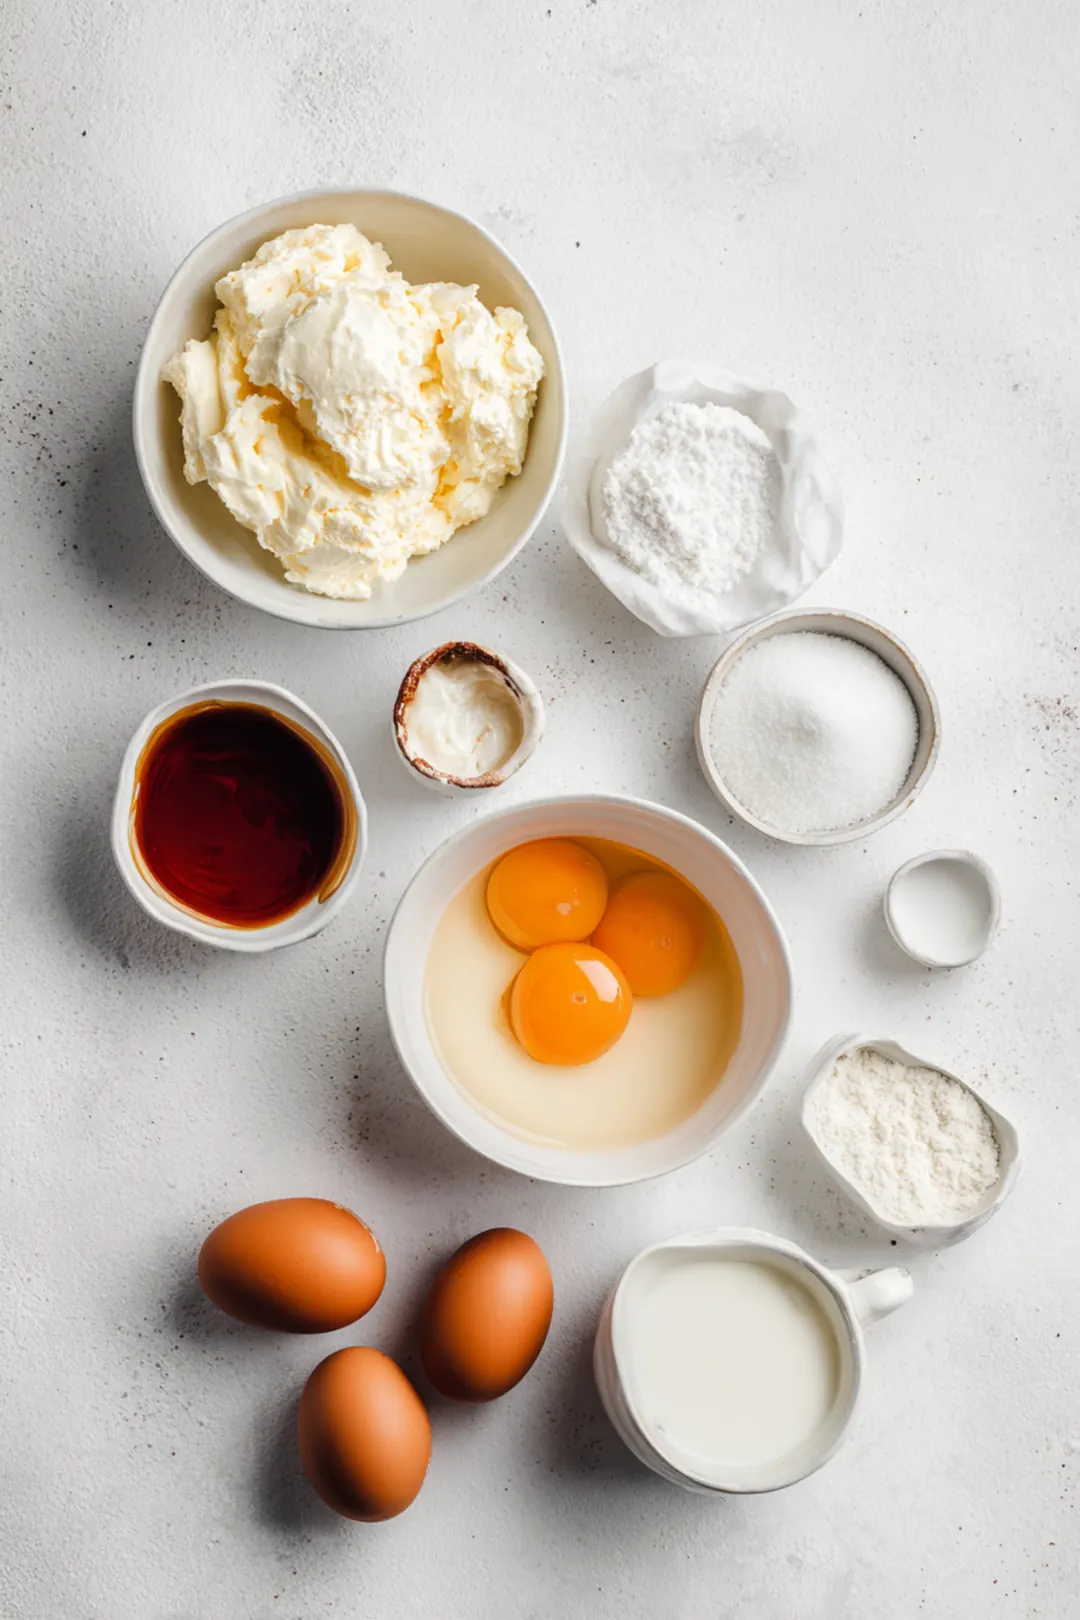
When it comes to the Burnt Basque Cheesecake recipe, quality ingredients are key. High-fat cream cheese is a non-negotiable must because it contributes immensely to the luxurious texture you desire. Choose a brand you trust, one known for its richness—this will significantly impact the final product.
Let’s not forget the sugar. Granulated sugar is preferable for that perfectly smooth batter, while powdered sugar can lend an interesting texture and enhanced sweetness. And do not overlook the importance of pure vanilla extract; a good-quality extract will elevate your flavor profile tremendously.
Substitutes and Alternatives
For those with dietary restrictions, worry not! You can substitute lactose-free cream cheese for a dairy-free option, and incorporating gluten-free base ingredients is a cinch if you’re accommodating gluten-sensitive eaters. For a fun twist, consider experimenting with alternative crusts. Almond flour can provide a nutty undertone while remaining gluten-free, and the slight texture variation adds a gourmet touch.
Step-by-Step Preparation Techniques
Mixing the Perfect Batter
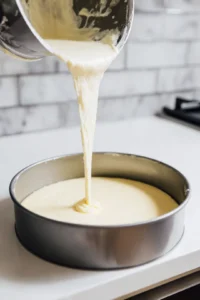
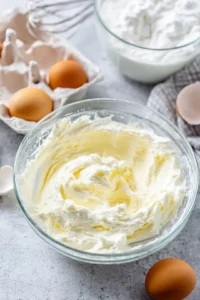
The secret to avoiding lumps and achieving that silky smooth texture in your batter? Start with room temperature ingredients! Cold cream cheese can lead to a lumpy mixture—definitely not what we want in our cheesecake!
Beat the cream cheese and sugar together until your arm feels like jelly. Once it’s smooth, add the eggs one at a time, ensuring proper mixing in between each addition. The aim here is a lump-free, creamy mixture—just like the ones you see in pastry shop displays.
Baking Your Cheesecake
Preheat your oven to a high 400°F (200°C) when it’s time to bake. If you’re a fan of air fryers—trust me, they can work wonders here! Adjust the temperature and cooking time accordingly to ensure even caramelization while keeping that moist interior. Visual cues are your best friends; look for a golden top that’s slightly jiggly in the center. The bake should generally take around 40 minutes. Consider pairing this cheesecake with some delicious Garlic Butter Steak Bites to make a wonderful meal!

Flavor Variations to Elevate Your Cheesecake
Seasonal Twists
Why not let the seasons guide your flavor choices? For autumn, consider infusing pumpkin spice for a festive twist, or in summer, fresh berry blends can really highlight the light, creamy texture of the Basque cheesecake. Remember that balancing the flavors is crucial; when you amp up the infusions, you might need to reduce sugar slightly or adjust the moisture content to keep things in harmony.
Special Occasions
Get creative for holiday gatherings! Think about festive variations like gingerbread for winter or citrus zest during springtime celebrations. Topping with seasonal fruits not only enriches flavors but also adds a pop of color to your presentation—making it truly Instagram-worthy for your guests to appreciate!
Tips to Ensure Success
Common Mistakes and How to Avoid Them
A common blunder is overmixing your batter, resulting in a dense texture—so mix just until combined. Keep an eye on that base crust; a soggy bottom can ruin your masterpiece. Prevent it by thoroughly baking just a bit longer and ensuring no extra moisture seeps in.
Expert Chef Jason’s Pro Tips
Invest in a quality springform pan! A non-stick variety lets you release that cheesecake effortlessly, ensuring it keeps its shape. The chilling process after baking is crucial; it not only firms up your cheesecake but also helps the flavors play together beautifully. As an engineer-turned-chef, I assure you: patience truly pays off in flavor development!
Nutrition Insights
When considering serving sizes, remember to manage those portions carefully! The USDA advises moderation in desserts, so savoring a small piece can be just as satisfying as having a larger slice.
Troubleshooting Your Cheesecake
What Went Wrong?
If you notice cracks forming, don’t panic! This could be due to rapid temperature fluctuations; using a water bath during baking can help create a more even heat distribution and prevent cracking.
Testing Flavor Profiles
Now let’s take a cue from my engineering side: conduct some taste tests! Photograph the final product and try out variations with different heat settings. You might discover that certain air fryer brands yield a crustier exterior while others encourage a softer, creamier interior. It’s all part of the cheesecake experimentation journey!
Plating and Presentation Tips
Making It Instagram-Worthy
When it comes to garnishing, think beyond the ordinary. A drizzle of caramel sauce or a sprinkle of seasonal fruit—not only do they enhance flavor, but also offer a striking visual contrast against that burnt top.
Enhancing the Experience
Serve your cheesecake alongside a wine that complements the creamy sweetness or a fruit compote that breaks up the richness. Don’t shy away from sharing the story behind your Basque cheesecake—after all, great food brings great conversation!
FAQ
What is the difference between burnt cheesecake and Basque burnt cheesecake?
Burnt cheesecake refers to any cheesecake that has a darkened, slightly caramelized top, while Basque burnt cheesecake specifically comes from the Basque region of Spain. It is characterized by its creamy, custardy texture and a crustless, rustic presentation.
What is special about Basque cheesecake?
Basque cheesecake stands out due to its unique burnt top, which creates a caramelized flavor that contrasts with its smooth, creamy filling. Flourless in nature, it is rich and indulgent; the combination of its rustic appearance and bold flavors presents a delightful treat.
What does Basque cheesecake taste like?
Basque cheesecake offers a rich, creamy texture paired with a slightly burnt, tangy flavor from the caramelization on top. Many describe the taste as a delightful mix between traditional cheesecake and flan, offering a unique culinary experience that balances sweetness with a hint of bitterness.
Which cream cheese is best for Basque cheesecake?
Soft cream cheese is ideal for making Basque cheesecake, as it ensures a smooth, creamy texture. Brands like Philadelphia are commonly recommended due to their consistent quality. For best results, always allow the cream cheese to soften at room temperature before mixing.
What are some variations of Basque cheesecake?
Variations of Basque cheesecake can include flavor infusions such as vanilla, citrus zest, or chocolate. Some recipes may incorporate different cheeses, like mascarpone, or use additives like fruit purees to enhance taste and texture. Experimenting can lead to delicious new twists that keep your guests coming back for more!
Conclusion
Mastering the art of Burnt Basque Cheesecake isn’t just about following a recipe; it’s about embracing its delightful irregularities and the rich culture it represents. With every bite, you’re experiencing a piece of Basque history. Don’t shy away from the charred exterior—it’s what makes this dessert shine. Remember, high-quality ingredients and careful mixing are key to achieving that heavenly, creamy filling we all crave. Don’t hesitate to experiment with seasonal flavors or clever substitutions that cater to your dietary needs. And if things go awry, a little troubleshooting can save the day! So, roll up your sleeves and dive into this delicious adventure; remember, every cheesecake tells a story, and yours is just waiting to be shared! Happy baking!
Mastering Burnt Basque Cheesecake: Tips & Variations!
Ingredients
Method
- Preheat your oven to 400°F (200°C). Line a 9-inch springform pan with parchment paper, making sure it overlaps the edges for easy removal.
- In a large mixing bowl, beat the cream cheese and sugar together until smooth. Add the eggs one at a time, mixing well after each addition, and pour in the heavy cream and vanilla extract. Mix until fully combined and completely smooth.
- Pour the batter into the prepared springform pan and bake in the preheated oven for around 40 minutes, or until the top is caramelized and slightly jiggly in the center. Let it cool before refrigerating for at least 4 hours before serving, topped with caramel sauce and fruits if desired.