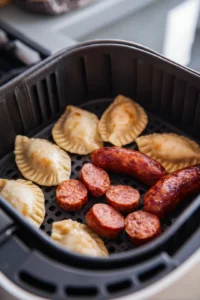
Savory Air Fryer Kielbasa & Pierogies Recipe
Ready to elevate your weeknight dinner with a dish that’s crispy, savory, and truly unforgettable? Picture this: sinking your teeth into air-fried kielbasa and pierogies, perfectly golden and bursting with mouthwatering flavors!
In this post, I’ll guide you through a step-by-step process to create this stellar comfort food right in your air fryer. We’ll cover essential tips to achieve that irresistible crunch and flavor profile that’ll have your family coming back for seconds. So, let’s dive straight into the delicious details and make dinnertime extraordinary!

Table of Contents
What To Remember
Before you fire up that air fryer, let’s cover some key insights that will ensure your kielbasa and pierogies come out perfectly crispy and bursting with flavor. Trust me, these tips can make a world of difference in your dish!
-
Crispy Texture Made Easy: It’s crucial to give your kielbasa and pierogies a light brushing of oil before air frying. This small step helps achieve that coveted golden-brown exterior we all crave, without the excess grease.
-
Don’t Overcrowd the Basket: Give your ingredients room to breathe in the air fryer. Overcrowding may lead to uneven cooking and a lack of crunch, which is definitely not what we want! I always aim for a single layer; it’s the secret to attaining that ultimate crisp.
-
Pierogi Prep: While boiling your pierogies beforehand isn’t necessary, it’s a great idea to thaw them if they’re frozen. This ensures even cooking and prevents any unwanted mushiness. I like to let mine sit out for about 20–30 minutes—this small step really pays off big in terms of texture!
-
Mind the Temperature: Preheat your air fryer to 400°F for optimal crisping. This high heat is key to sealing in those juices while allowing that delightful crunch on the outside. Think of preheating as getting your air fryer out of bed—it sets the stage for deliciousness!
-
Flavor Boosters: Don’t overlook the impact of additional seasonings! Consider adding garlic powder or smoked paprika to the oil before brushing it onto the kielbasa. These subtle enhancements can elevate the dish from tasty to truly exceptional. For example, you might find inspiration from an air fryer chicken and broccoli bowl for additional flavors.
-
Serving Tips: Pair your dish with a side of mustard or a tangy dipping sauce to complement the savory flavors. A sprinkle of fresh herbs can also bring a pop of color and freshness. I love using chives or dill; they add a vibrant kick!
-
Mistakes to Avoid: Resist the temptation to skip the oil! Even though air fryers use hot air to cook, a little oil goes a long way in achieving that sought-after crispy finish.
Ingredients You’ll Need
Essential Ingredients
-
Kielbasa: Fresh or smoked—you choose! A one-pound (450 grams) package will make for a hearty meal that satisfies without much fuss.
-
Pierogies: Grab a 24-ounce (680 grams) pack of frozen or fresh pierogies. I personally recommend going for frozen—they save time while being just as flavorful and perfectly crispy in the air fryer!
Flavoring Ingredients
-
Olive oil: You’ll need about two tablespoons (30 ml) for tossing the ingredients. This helps achieve that delightful crunch. If you’re looking for a no-oil method, using a light cooking spray is a great alternative.
-
Optional seasonings: A teaspoon each of garlic powder, smoked paprika, salt, and pepper will enhance flavors beautifully. You might also experiment with my favorite, one teaspoon of onion powder, for that delectable aroma.

Preparation Steps
Thawing Pierogies
Before cooking, it’s important to thaw those pierogies, as doing so can significantly improve texture. They’ll cook more evenly without ending up mushy! You can either leave them in the fridge overnight for a gentle thaw, or quickly defrost them in the microwave for about 1-2 minutes—just be sure not to let them warm up too much! I recommend the microwave for those short on time—it’s a fast and effective method!
Preparing Kielbasa
For even cooking, slice your kielbasa into bite-sized pieces, roughly 1/2-inch thick. This guarantees crispiness all around and helps achieve that beautiful golden-brown color we desire. Feel free to sprinkle some seasoning on the sliced kielbasa to infuse it with flavor. A little homemade garlic mix can work wonders! You could also explore an air fryer turkey meatball and zucchini dinner for a similar hearty option.
Air Frying Process
Cooking Temperature and Time
Preheat your air fryer to 400°F (200°C)—this crucial step is essential for that perfect crispy finish. Once hot, it’s time for the magic!
Cooking times can vary, but typically, the kielbasa will take about 15 minutes to get perfectly cooked.
Cooking Method
Here’s how to bring all the components together perfectly:
-
In a large bowl, combine the sliced kielbasa, thawed pierogies, olive oil, garlic powder, onion powder, and smoked paprika. Toss everything together until every piece is evenly coated.
-
Place the kielbasa and pierogies in the air fryer basket in a single layer for the best results. Cooking in batches is key—more space equals better air circulation and that sought-after crispiness. You might get inspired to try an air fryer salmon and asparagus one pan as well, which cooks perfectly in a similar manner!
Tips for Perfect Results
Achieving the Ideal Crunch
Want that perfect crunch? The oil plays a significant role in crisping while keeping things light. If you’re feeling adventurous, consider using different oils like avocado or grapeseed oil that boast high smoke points and complement those flavors brilliantly. I enjoy alternating oils just for the fun of experimenting with taste!
Avoiding Common Mistakes
Beware of overcrowding the air fryer basket! This is a frequent mistake that can lead to uneven cooking. Also, don’t forget to season! Skipping this can dull the flavors of the kielbasa, which can be a real missed opportunity for building delicious complexity.
Serving Suggestions
Best Dipping Sauces
Once your kielbasa and pierogies are perfectly cooked, consider serving them with zesty dips. Mustard varieties—like spicy brown or honey mustard—add a delightful tang. Explore further with options such as sour cream or even a zippy horseradish sauce to create a real flavor experience!
Garnishing for Presentation
To elevate your dish visually and flavorfully, top it with fresh herbs. Chopped parsley or dill adds a wonderful brightness to the dish. Just sprinkle generously over the finished plate before serving to impress your guests!
Nutritional Considerations
Health Benefits of Air Frying
Let’s talk about the health aspect! Air frying is fantastic because it uses significantly less oil compared to traditional deep frying. This means you can indulge in crispy textures while contributing positively to your overall nutritional goals. As the Mayo Clinic suggests, “Air frying cuts down on calories and fats, making it easier to maintain a healthy and balanced diet.” You can also look into options like an air fryer cod and cherry tomatoes for healthy alternatives!
Variations to Try
Alternative Proteins
Feeling like mixing things up? Consider other sausage options like turkey or chicken sausage for lighter alternatives. If you’re curious about plant-based options, why not try using tofu or tempeh for a delicious twist? You could experiment with something like air fryer tofu and green beans stir fry for a delicious vegetarian option.
Different Types of Pierogies
Don’t settle for standard flavors; explore the world of pierogies! Potato, cheese, or sauerkraut-filled options add an exciting dimension to your meal. For a fun twist, consider making your own fillings to personalize your pierogies to your heart’s desire!
FAQ
How long do you cook kielbasa in an air fryer?
Cook kielbasa in an air fryer at 380°F (193°C) for about 8–10 minutes, flipping halfway through for even cooking and a perfectly crispy exterior that enhances that savory, mouthwatering flavor.
Do you have to boil pierogies before air frying?
No, boiling pierogies before air frying isn’t necessary! Simply thaw frozen pierogies and air fry them at 375°F (190°C) for around 12–15 minutes for crispy results without the extra step.
What are the common mistakes when air frying kielbasa?
Common mistakes include overcrowding the air fryer basket (which hinders proper airflow) and failing to preheat the air fryer, impacting cooking time. Always ensure even spacing for the best texture and flavor.
Should I oil kielbasa before air frying?
While not strictly necessary, lightly coating kielbasa with oil can enhance crispiness and flavor with that golden-brown outer layer you crave.
Conclusion
And there you have it! This savory air fryer kielbasa and pierogies recipe is not just a tasty dish, but a testament to how simple ingredients can transform into something truly special with the right technique. Remember, preparation is key—thawing your pierogies and cutting the kielbasa just right go a long way toward achieving that delightful crunch. Don’t hesitate to experiment with different seasonings and dipping sauces; it’s all about personalizing this dish to make it your own. So, roll up your sleeves, embrace the magic of your air fryer, and serve up a plateful of comfort that’s light on the waistline but heavy on flavor. Happy cooking, my friends!

Savory Air Fryer Kielbasa & Pierogies Recipe
Ingredients
Method
- Preheat the air fryer to 400°F (200°C).
- In a large bowl, combine the sliced kielbasa, frozen pierogies, olive oil, garlic powder, onion powder, and smoked paprika. Toss until evenly coated.

- Place the kielbasa and pierogies in the air fryer basket in a single layer. Cook for 15 minutes, shaking the basket halfway through for even cooking. Serve hot and enjoy!